How-to Use Matroska In/Out with FFmpeg
In this guide, we’ll cover tips and tricks to improve your encoding experience using Matroska In/Out with your FFmpeg scripts/settings. Be warned, the topic is broad, so there’s quite a bit to go through!
This guide contains advanced knowledge, so if you’re confused or get stuck, feel free to contact us.
Requirements
- MistServer installed and running
- FFmpeg installed
Steps in this Guide
- When to Use Encoding
- Why Matroska In/Out and FFmpeg?
- Setup and Usage
- Best Practices & Tips
- Examples
- Troubleshooting
1. When to Use Encoding
Here’s a brief explanation: You will likely want to use encoding when your media is incompatible with your end user’s setup or when the source material you are working with is too high quality and the bandwidth costs would bleed you dry.
The two main components of media delivery are the codec (compression method) and the protocol. MistServer covers the protocol part with efficient transmuxing, so you’re set there. However, encoding is needed when you want to change aspects like the resolution, framerate, bitrate, keyframe interval, or codec. This is particularly important when the original media isn’t compatible with your intended use or end user.
Important Notice
Encoding will always impact the quality of your stream. You cannot upscale low-quality content and expect high-quality results. In most cases, the best you’ll achieve is matching your input quality.
2. Why Matroska In/Out and FFmpeg?
We provide minimal encoding through FFmpeg, but for more customization, you’ll need to write your own script. Matroska In/Out with FFmpeg (or GStreamer) offers more flexibility. While there is no immediate advantage of one tool over the other, this guide will focus on FFmpeg for simplicity.
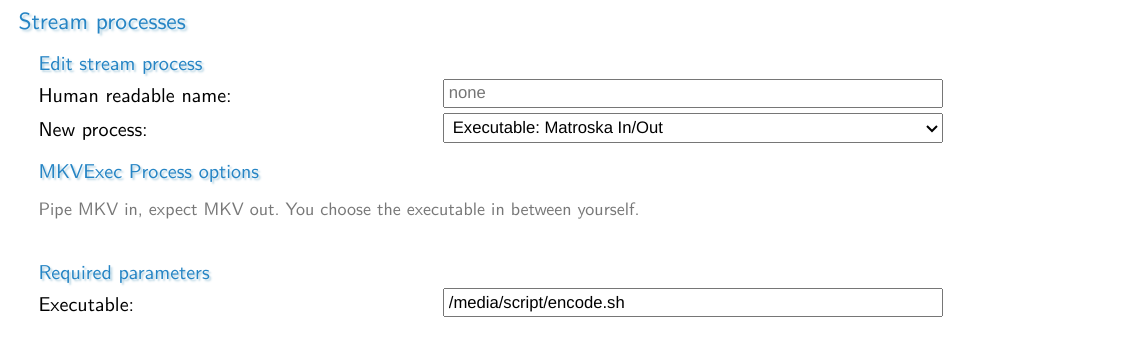
3. Setup and Usage
If you have basic knowledge of FFmpeg, the setup is simple. You’ll need to write a script or command that reads from standard input, applies your desired encoding settings, and outputs to Matroska format:
ffmpeg -i - CODEC_OPTIONS -f matroska -
By default, all video and audio tracks are passed to FFmpeg. If you want to use specific tracks or remove certain audio or video tracks, you can do so by specifying optional parameters. You can also have your processing command activate only if specific codecs are missing like AAC.
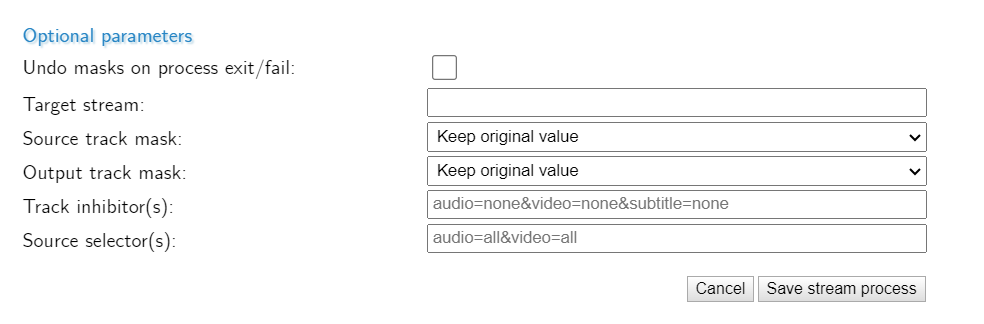
MistServer Optional Parameters
- Undo masks on process exit/fail: Determines if source/output track masks should be undone if encoding stops or fails.
- Target stream: Directs the encoded output to another stream within MistServer.
- Source/Output track mask: Controls which processes have access to the incoming and created quality.
- Track inhibitor(s): Uses track selectors to prevent startup if specific tracks are present.
- Source selectors: Determines which audio, video, or metadata tracks should be passed.
Core of CODEC_OPTIONS for FFmpeg
Selection of Audio or Video
FFmpeg primarily works with three track types: video, audio, and metadata. We’ll focus on video and audio here since metadata has limited support in live streams.
You can select the desired track type and number using this syntax: -c:TYPE:NUMBER, where types are:
v = videoa = audio
If there are multiple tracks, use numbers starting from 0 for the first track. If there’s only one track, you can skip specifying the number.
Examples:
-c:v h264— Video using H264 software encoding-c:v h264_nvenc— Video using Nvidia NVENC H264-c:a opus— Audio using Opus-c:a aac— Audio using AAC
Video Settings
You’ll want to configure a few key video settings. Always refer to the FFmpeg documentation for codec-specific options.
- Resolution:
-s:v XxY(e.g.,-s:v 1920x1080) - Bitrate:
-b:v value(e.g.,-b:v 2000k) - Keyframe interval:
-g:v frames_between_keyframes(e.g.,-g:v 25) - Framerate:
-r:v framerate(e.g.,-r:v 30)
Sometimes a filter like -filter:v fps=30 is more effective than setting framerate directly.
Audio Settings
Audio settings are simpler, but still important:
- Bitrate:
-b:a value(e.g.,-b:a 128k) - Channels: -
ac:a value(e.g.,-ac:a 2 for stereo) - Sample Rate:
-ar:a value(e.g.,-ar:a 48000)
4. Best Practices & Tips
CPU vs Hardware
While FFmpeg works with software encoding by default, hardware encoding is generally faster and more efficient, especially for low-latency or multiple concurrent streams. Most CPUs support hardware encoding, so it’s worth checking if your system can use it.
Check FFmpeg's hardware options or run ffmpeg -encoders to see available encoders.
Mapping and Multi-process Setup
FFmpeg decodes video/audio before re-encoding, so it’s resource-efficient to process all tracks at once. You can map the same audio/video track multiple times and apply different encoding settings to each one.
ffmpeg -i STREAM/FILE -map v:0 -map v:0 -map v:0 -map a:0 -map a:0 .....
This example maps the first video track three times and the first audio track twice. To then use as 3 separate video tracks (-c:v:0, -c:v:1 and -c:v:2) with one audio track when you get to the CODEC_OPTIONS part of the syntax.
Useful FFmpeg Flags/Tips
Most of these will be shown in practise at our given examples!
Usage of ' or " will require a script!
MistServer does not handle commands correctly should they include/requre the usage of ' or ". The solution here would be to convert your command to a bash script and then using this script instead of the command itself.
Removing Header
FFmpeg always fills in a huge chunk of header information. This is passed in standard out and will end up into MistServer as well. MistServer should ignore this, but it could cause erros in an input when something restarts/reconnects. Causing unintended restarts on the encoder process.
Add the following to the input side of FFmpeg:
-hide_banner
Removing debug messages
Likewise error messages are passed onto MistServer as well, which can mess up with the input process as well.
Add the following to the input side of FFmpeg:
-loglevel quiet
This wil remove these debug/error messages. However keep in mind that if you test your FFmpeg command/script outside of MistServer this will hide valueble debug information as well!
Forcing keyframe interval sync
When adding extra video qualities you will likely want keyframes to match, as this is important for proper adaptive bitrate playback for protocols such as HLS or DASH.
-force_key_frames source
This option is set at the end of your CODEC_OPTIONS.
Matroska cluster size
While normally the Matroska cluster size should be at a size to always contain a keyframe, we've found when reading Matroska progressively setting the cluster time limit to 0 actually stabilizes the ingest quite a lot.
-cluster_time_limit 0
This option is set at the end of your CODEC_OPTIONS.
Bframes
Without going into too much detail bframes are a method of giving encoding instructions in both the past or future on how to handle frames. This saves you some bandwidth, but on lower latency can cause weird playback behaviour. If you are not concerned with bandwidth I would always recommend removing them.
-bf 0
This option is set at the end of your CODEC_OPTIONS.
Presets / Tuning
Presets are a big method to reduce CPU/hardware usage. Setting a preset tells FFmpeg how much variance in quality is allowed in favor for speed. Every encoder comes with its own presets and should be looked up. In general the faster the preset, the less resources needed and the better the latency of the encode, but you also take a hit in quality. For the default H264 encoder within FFmpeg the following are available:
ultrafast
superfast
veryfast
faster
fast
medium – default preset
slow
slower
veryslow
Generally these are passed at the end of CODEC_OPTIONS
-preset veryfast
Every encoder has different presets, look them up! For some encoders tuning should be used instead
-strict experimental
Also known as -strict -2
This sets 2 values for FFmpeg:
strict: strictly conform to all the things in the spec no matter what consequences.
experimental: allow non standardized experimental things.
This sounds scary, but if your codec just isn't working for "some reason". Chances are you needed to add this setting. FFmpeg has a lot of different versions and you might be using one where a codec isn't fully released yet.
Audio/Video sync tip
Sometimes just encoding video or audio could cause the end result to go out of sync. Generally this means the context between audio and video is lost. To counter this you can simply add the Audio or Video to the process, and copy its quality. That will leave the sync intact, while taking up almost no extra resources. At this point it is usually best to start masking the source qualities for playback.
Examples
Adding a single video quality
This command takes the source quality and adds a video quality for 720p. It assumes you're passing the video=>1280x720&audio=none to both only select video higher than 720p and to remove any audio from the feed going into the encoder. You generally do not want to upscale video as it will almost always look bad.
ffmpeg -loglevel quiet -hide_banner -fflags nobuffer -i - -c:v h264 -b:v 2000k -s:v 1280x720 -force_key_frames source -cluster_time_limit 0 -preset ultrafast -bf 0 -f matroska -

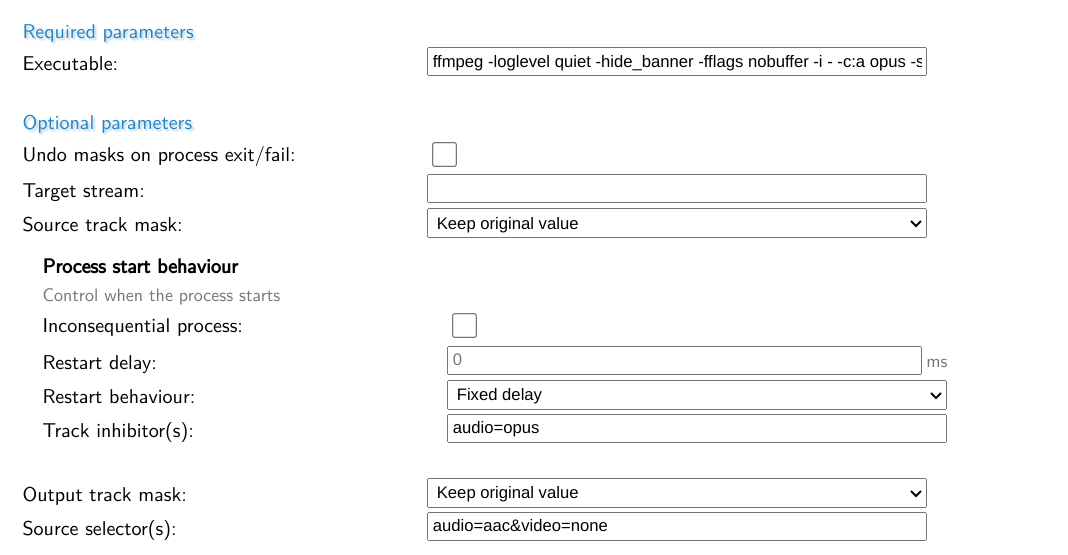
Adding a single audio quality
Opus
This command takes the audio track and creates an additional opus track. You would want to use something like this when you want to provide WebRTC playback with audio.
By passing the following source selection: audio=aac&video=none or audio=all&video=none.
Recommended is to inhibit this process if opus is present with track inhibitor: audio=opus.
ffmpeg -loglevel quiet -hide_banner -fflags nobuffer -i - -c:a opus -strict -2 -f matroska -
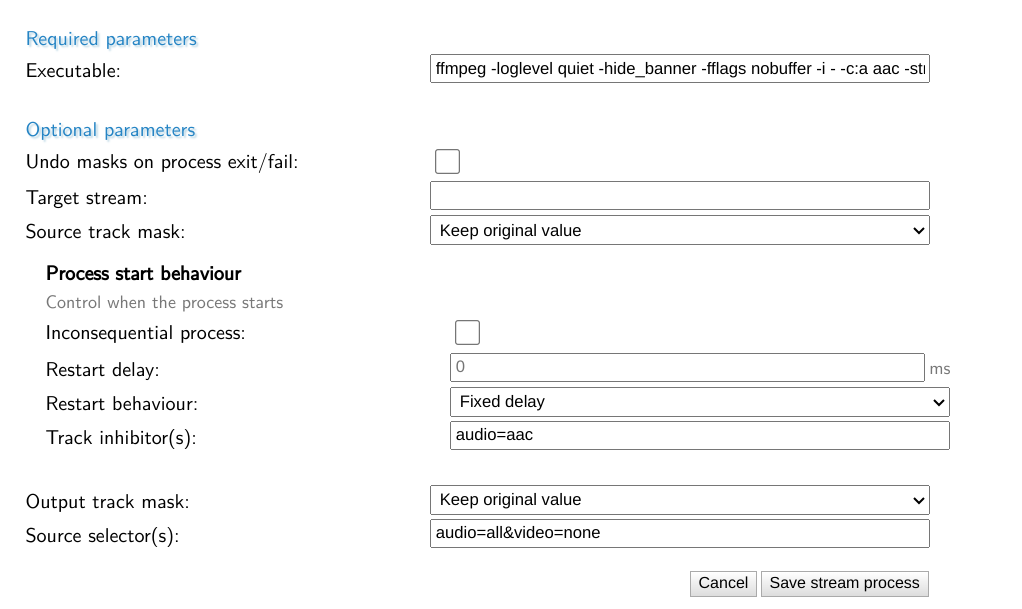
AAC
This command takes the audio track and creates an additional aac track. This is important when you're using ingests like WebRTC that only contain opus. For source selector we will pass audio=all&video=none and track inhibitor on audio=aac.
ffmpeg -loglevel quiet -hide_banner -fflags nobuffer -i - -c:a aac -strict -2 -f matroska -
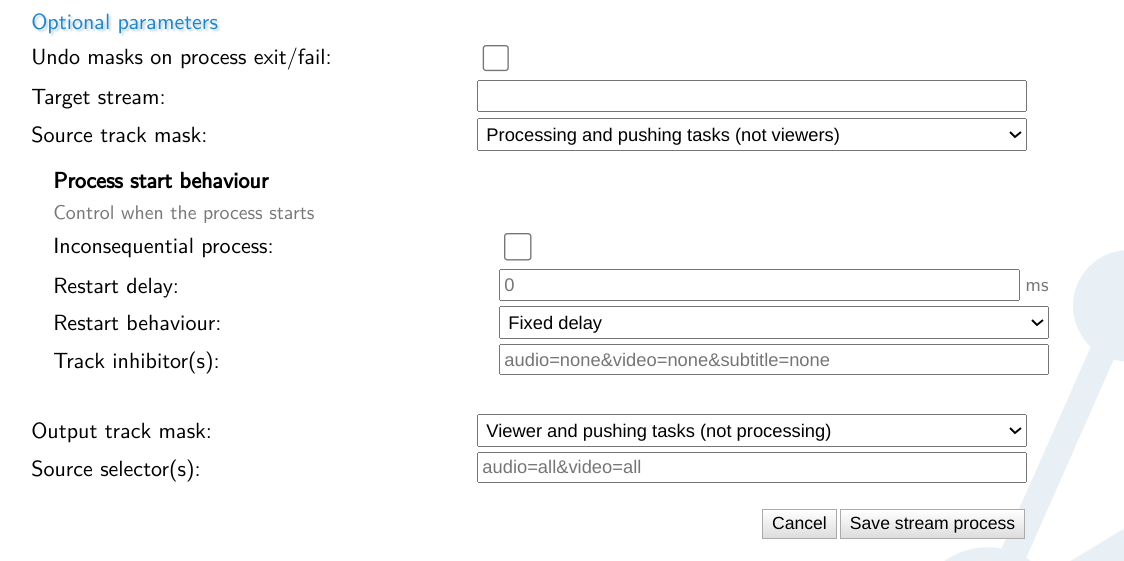
Copy source tracks and add additional video qualities
This command takes the source quality for audio/video and adds a quality for 720p, 480p and 360p.
Since we're including the source qualities through FFmpeg we would recommend setting the source track mask to Processing and Pushing tasks. That way Viewers cannot reach the original qualities, but you can record and start other stream processes using the added qualities.
Likewise we would recommend to set the Output track mask to allow Viewers and Pushing tasks, but not processes. That way should you set up another stream process you will not accidentally work off a lesser quality stream.
ffmpeg -loglevel quiet -hide_banner -fflags nobuffer -i - -map v:0 -map v:0 -map v:0 -map v:0 -map a:0 -c:v:0 copy -c:v:1 h264 -b:v:1 2000k -s:v:1 1280x720 -c:v:2 h264 -b:v:2 1000k -s:v:2 854x480 -c:v:3 h264 -b:v:3 500k -s:v:3 640x360 -c:a:0 copy -force_key_frames source -bf 0 -cluster_time_limit 0 -preset ultrafast -f matroska -
Converting a command to a bash script
Instead of putting down the entire ffmpeg command you can also point the stream process to a script. For Linux the easiest is a bash script. This can be done simply by creating a file and adding the following header:
#!/bin/bash
You then add the ffmpeg script and make the script executable through:
chmod +x file
That is all.
Example, encode.sh saved in /media/script/ containing:
#!/bin/bash
ffmpeg -loglevel quiet -hide_banner -fflags nobuffer -i - -map v:0 -map v:0 -map v:0 -map v:0 -map a:0 -c:v:0 copy -c:v:1 h264 -b:v:1 2000k -s:v:1 1280x720 -c:v:2 h264 -b:v:2 1000k -s:v:2 854x480 -c:v:3 h264 -b:v:3 500k -s:v:3 640x360 -c:a:0 copy -force_key_frames source -bf 0 -cluster_time_limit 0 -preset ultrafast -f matroska -
Troubleshooting
My added video/audio isn't working?!
Almost every time this comes down to one of two reasons:
- Your encoding settings are problematic and can't work or crash
or
- Your encoding IS working, but it's severely delayed
Luckily both an be fixed.
Debugging an ffmpeg script/command
The first thing you need to do is remove all banner/log level hiding scripts you might have inserted. These are usually -loglevel quiet -hide_banner.
Now, we’ll make a small adjustment to the script. Instead of using -i -, we will manually request the MKV stream output from MistServer.
For example, if I were debugging the stream mylivestream, I would use:
-i http://mistserveraddress:8080/mylivestream.mkv (assuming the default HTTP port for MistServer is 8080).
Next, manually run the script. If you have a graphical interface, you can pass the command into ffplay and "see" the result yourself. If you're working on a server, I recommend saving the result to a file, transferring it over, and then checking it.
At the end, we will replace - with either -| ffplay for viewing the stream directly or simply test.mkv for recording to a file.
The final result would be something like this:
ffmpeg -i http://mistserveraddress:8080/mylivestream.mkv CODEC_OPTIONS -f matroska - |ffplay -
or
ffmpeg -i http://mistserveraddress:8080/mylivestream.mkv CODEC_OPTIONS test.mkv
From there on FFmpeg should be giving you warnings & errors about what might be going wrong.
You can select specific audio/video tracks as well by changing the .mkv address. Add them to the url: e.g.
http://mistserveraddress:8080/mylivestream.mkv?audio=none&video=hevc
Though you might need to pay attention to what characters bash parses, and set the entire url between parenthesis '.
ffmpeg -i 'http://mistserveraddress:8080/mylivestream.mkv?audio=none&video=hevc' CODEC_OPTIONS -f matroska - |ffplay -
Slow processes / Quality just shows black
This often results in just a black screen for video or no sound at all for audio. MistServer will report the additional codec quality for playback, but it simply won’t work. You might see the video work if you seek back several seconds, however.
Fortunately, you can observe this state using our new Status page for each stream. If you scroll down, you'll see a representation of all the video/audio tracks available, what their buffers look like, and what would be the "good" live point for playback.
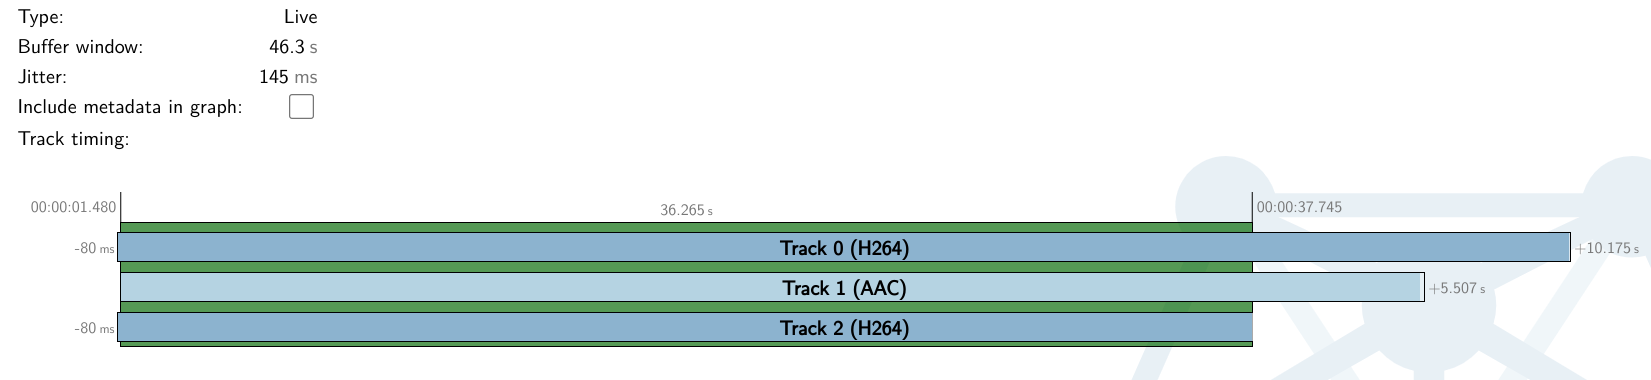
This is quite a poor state for a stream. One track may be 10 seconds ahead of another, with the audio somewhere in between. MistServer will pick the point where all tracks are available for valid playback, but if your process is this slow with encoding, I would doubt if there’s valid video to begin with. Chances are that the second video quality is not playable at all.
The solution here is almost always to use either hardware encoding or a faster encoding preset. Hardware encoding is preferable as it offers less of a quality loss compared to a faster preset, but you’ll have to make do with your available options.