Using the composer
what is the Composer/Multiviewer?
With MistServer 3.10 the newly released MistProcComposer has been added. The composer was first created with multiview/grid compositing in mind. It has far outgrown this original purpose and is now capable of so much more. This guide will help you get started with setting up everything to play around with the composer and understand the many use cases available such as:
- Mixing/Matching multiple video feeds
- Adding logos
- Adding backgrounds
- 24/7 live channels
- Fallback streaming
We had a presentation about it at FOSDEM2026 It is however also available at our Youtube channel
Composer workflow
Compressed/Encoded audio/video workflow
The following workflow is assumed when compressed tracks come in. It does not matter what kind of compression the audio or video use, so H264/AAC is used for the use-case.
Raw audio/video workflow
When raw audio/video is immediately available from the ingest (such as V4L2 or SDI ingest) the process becomes much easier.
Encoding is necessary
The composer uses raw video and audio to do its work. This means that unless your feed already comes in as a raw feed you will be needing encoding. MistServer can be build with MistProcAV which is an implementation of Libav and the easiest way to create sources for the Composer.
This also means that no matter what you do, you will be using either CPU or GPU to manipulate your feeds. The good news however is that MistServer uses a smart ringbuffer design that allows MistServer to use raw video and audio tracks efficiently for every output that (re)uses them. The main warning to give here is that there is limited scalability, so be aware of the limitations of your hardware.
Step 0. Building MistProcAV
Compiling with MistProcAV you will need to add this to the compile flags. The only reason this isn't done automatically is because to run MistProcAV correctly it will need to be build for your system specifically. This means it will always work if you compile & run locally, however sharing this with another server has no 100% guarantee that it will work. This has made distribution challenging.
- LibRIST requires installation in order to be used, we recommend either installing it before compiling MistServer, or adding
-DNORIST=trueas additional compile flag.
Request a build
We can prepare an image for various platforms from our build system. However in order to provide theese properly we'd need to know your OS as creating & leaving a build per OS on our website would just clutter everything.
Contact us and we'd be happy to provide you one, or guide you on self-compiling should we not have one prepared.
Self-compiled
More information on how to compile MistServer can be found in the compile documenation. The short summary would be:
- Install dependencies
- Pull in MistServer from github
- Set the compile flag
-DWITH_AV=true - Build MistServer
To easily do this you will need the following installed:
git, any c++ compiler (e.g.clang,gcc-c++) ,meson,libav
Ubuntu 22.04
Ubuntu 22 requires installing meson/ninja through pip. All other requirements are available normally.
apt-get -y update && apt-get -y install build-essential python3-pip ffmpeg pkg-config libavformat-dev libavutil-dev libavcodec-dev libswscale-dev libavfilter-dev m4 wget libgmp-dev  git curl

python3 -m pip install meson ninja
Optionally the Nvidia driver could be added:
nvidia-driver-590-server
Ubuntu 24.04
Ubuntu 24 can install all requirements dire
apt-get -y update && apt-get -y install build-essential cmake python3-pip ffmpeg pkg-config libavformat-dev libavutil-dev libavcodec-dev m4 wget libgmp-dev libswscale-dev libavfilter-dev meson ninja-build git
Arch Linux
Arch linux should only need a very minimal setup in order to compile with MistProcAV.
pacman -Syu ffmpeg meson git ffnvcodec-headers
Docker
The MistServer Bootstrap images should be the easiest to use and provide additional options such as adding HTTPS through caddy.
git clone https://github.com/ddvtech/mistserver-bootstrap
cd mistserver-bootstrap
docker compose up
Step 1. Preparing your sources
Any stream within MistServer that you want to use as a source will require a UYVY track for video and a PCM track for audio.
The most suitable solution for this is MistProcAV, should you not have MistProcAV please go back to the previous step!
While we suggest preparing your sources before adding them to the composer the order does not truly matter. So do not fret if you forget this step
You will need to do this for every stream you like to use within your composer
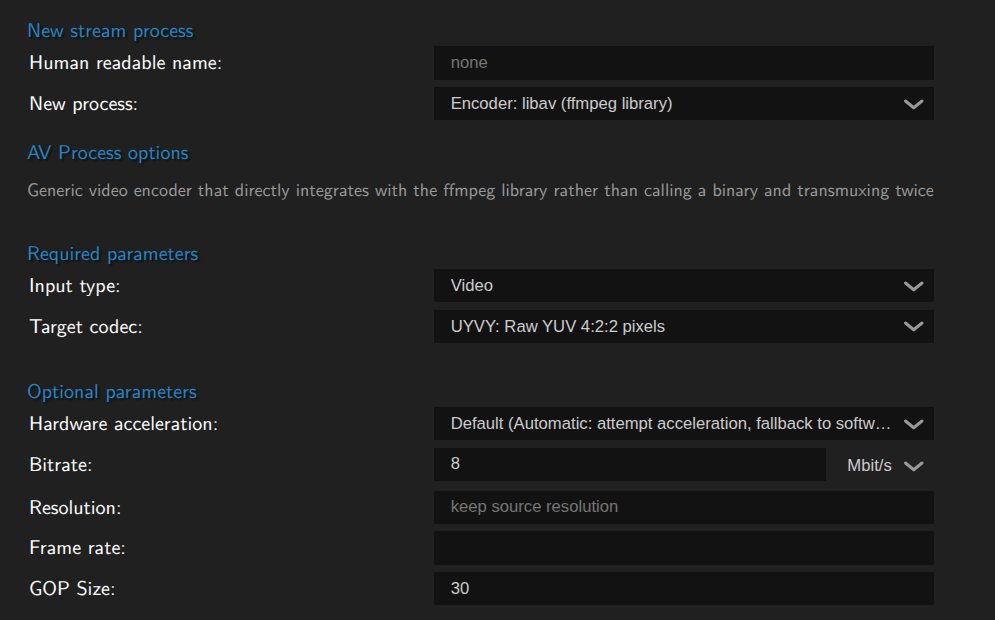
Video
Preparing your video sources is easy. The libav encoder should be selected by default, all you have to do is select UYVY for Video. By default MistServer will attempt to use hardware, and if none is found or available it will fall back to software mode.
The only setting that is used here would be resolution. In an upcoming version the settings will change to reflect this.
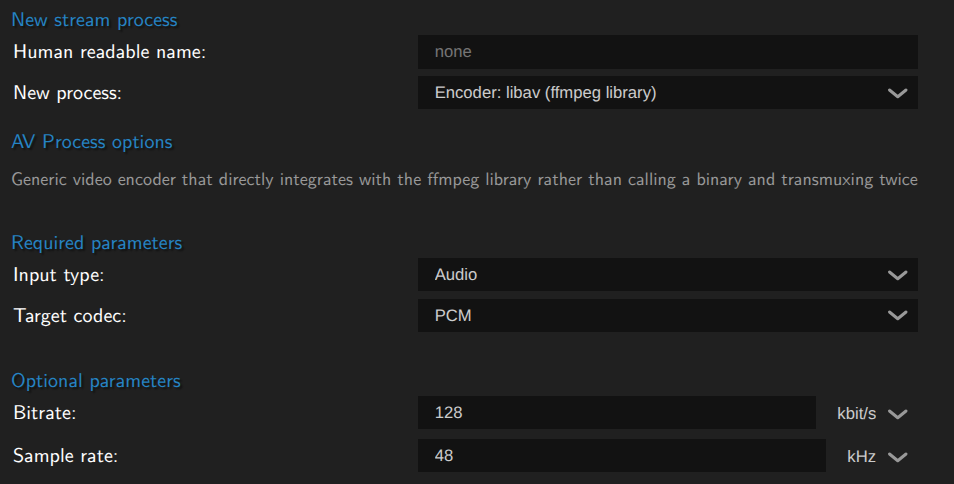
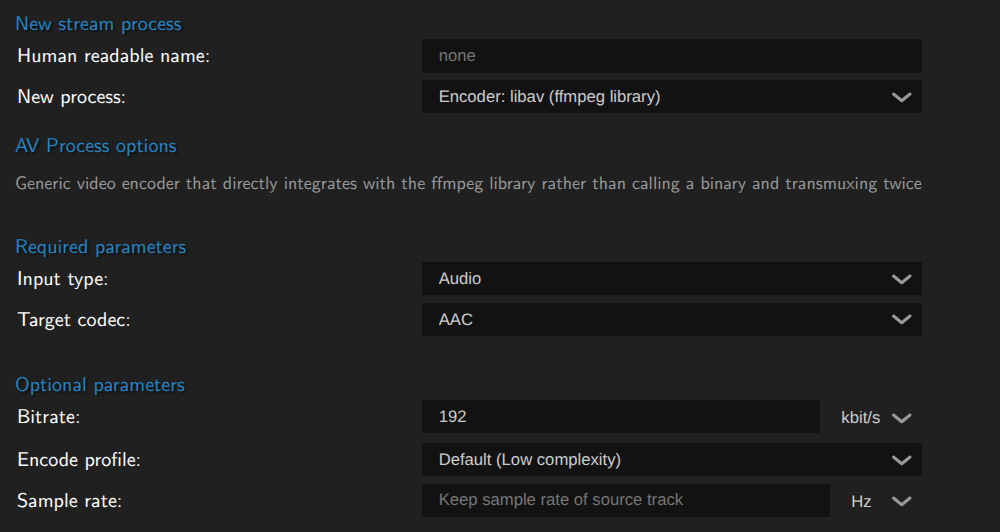
Audio
Preparing audio sources is easy as well. You will need to select Audio instead of video, however the libav encoder should stay default when you switch over. Afterwards select PCM for raw audio.
The only setting that can be set here is sample rate, however unless you know what you're doing we recommend not touching it.
Step 2. Creating your composer
Setting up the composer
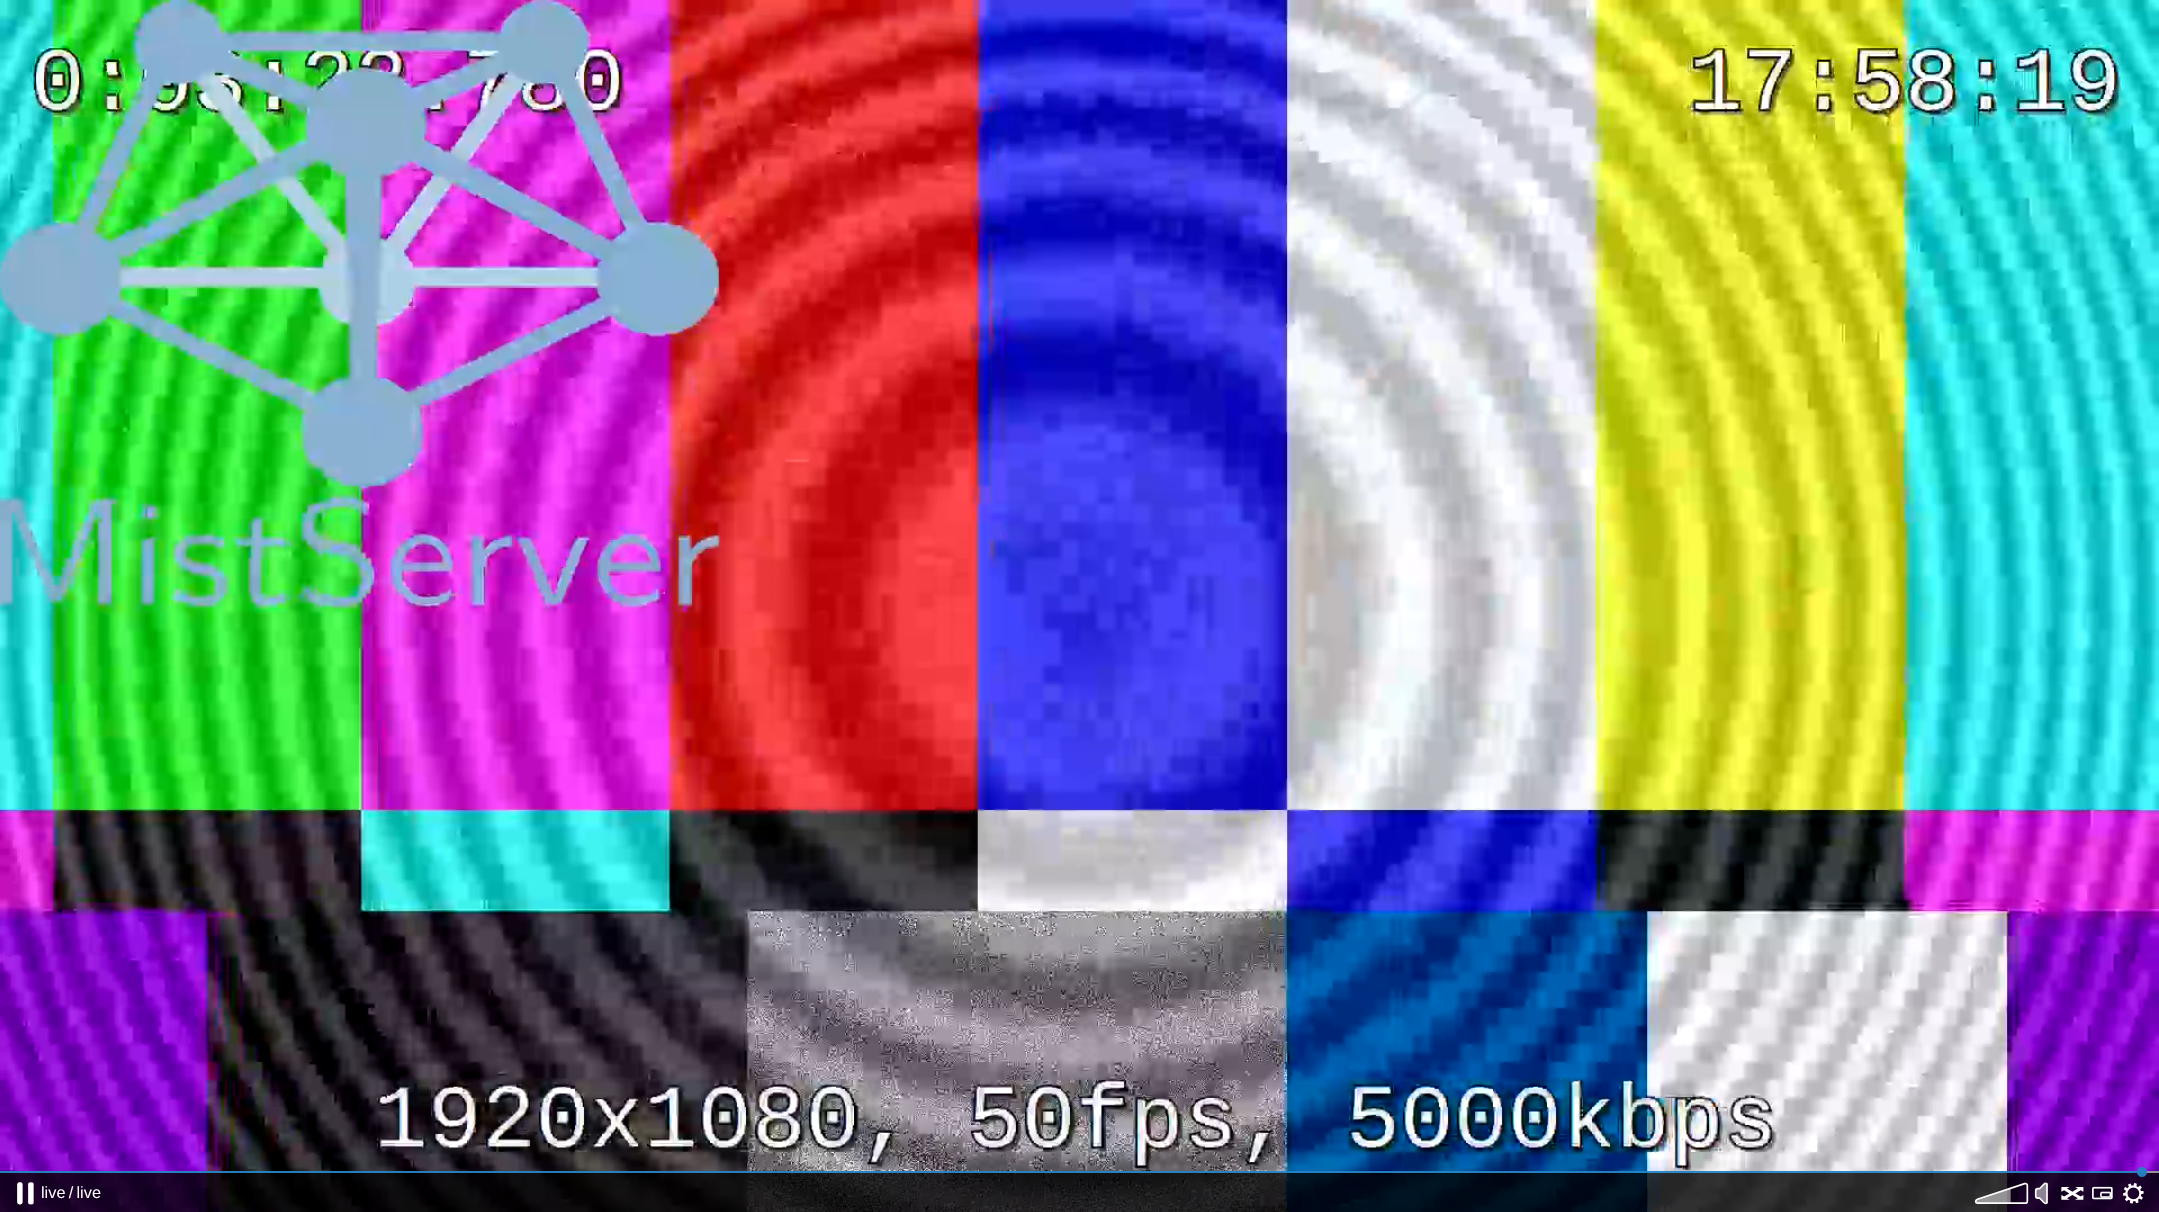
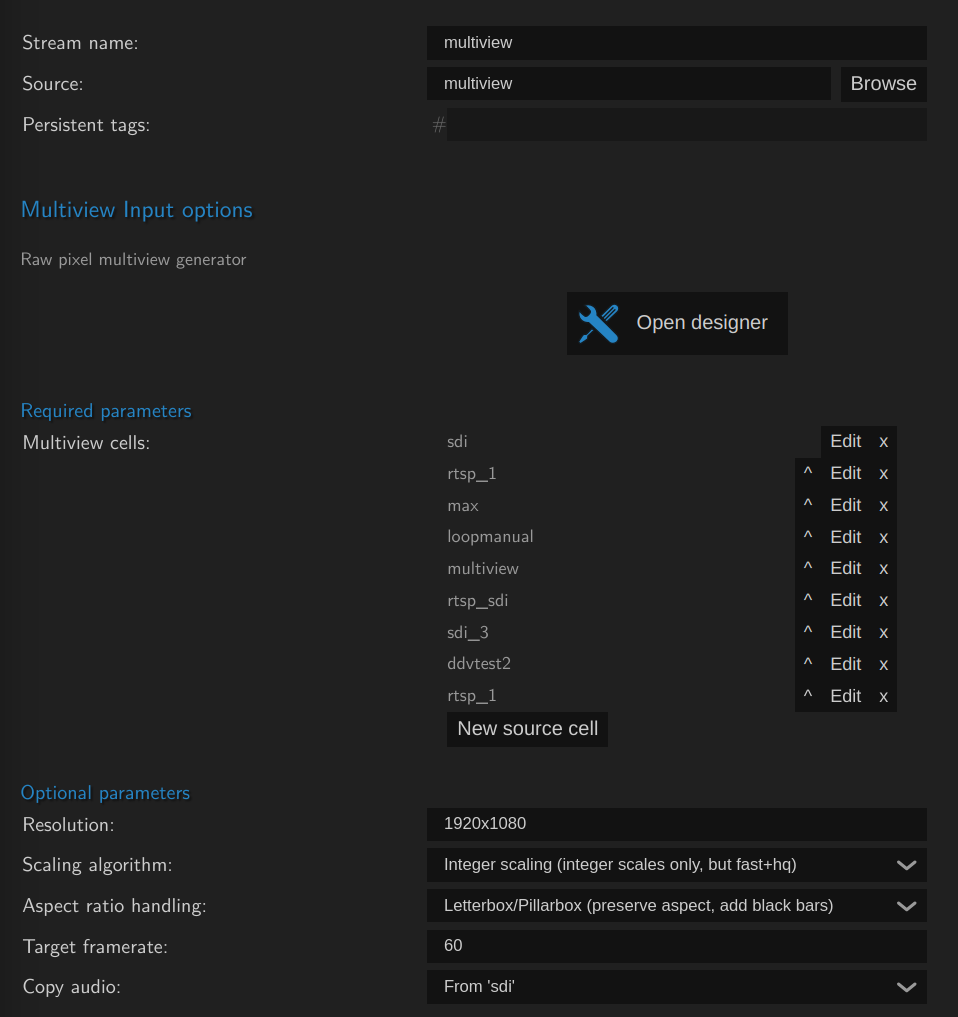
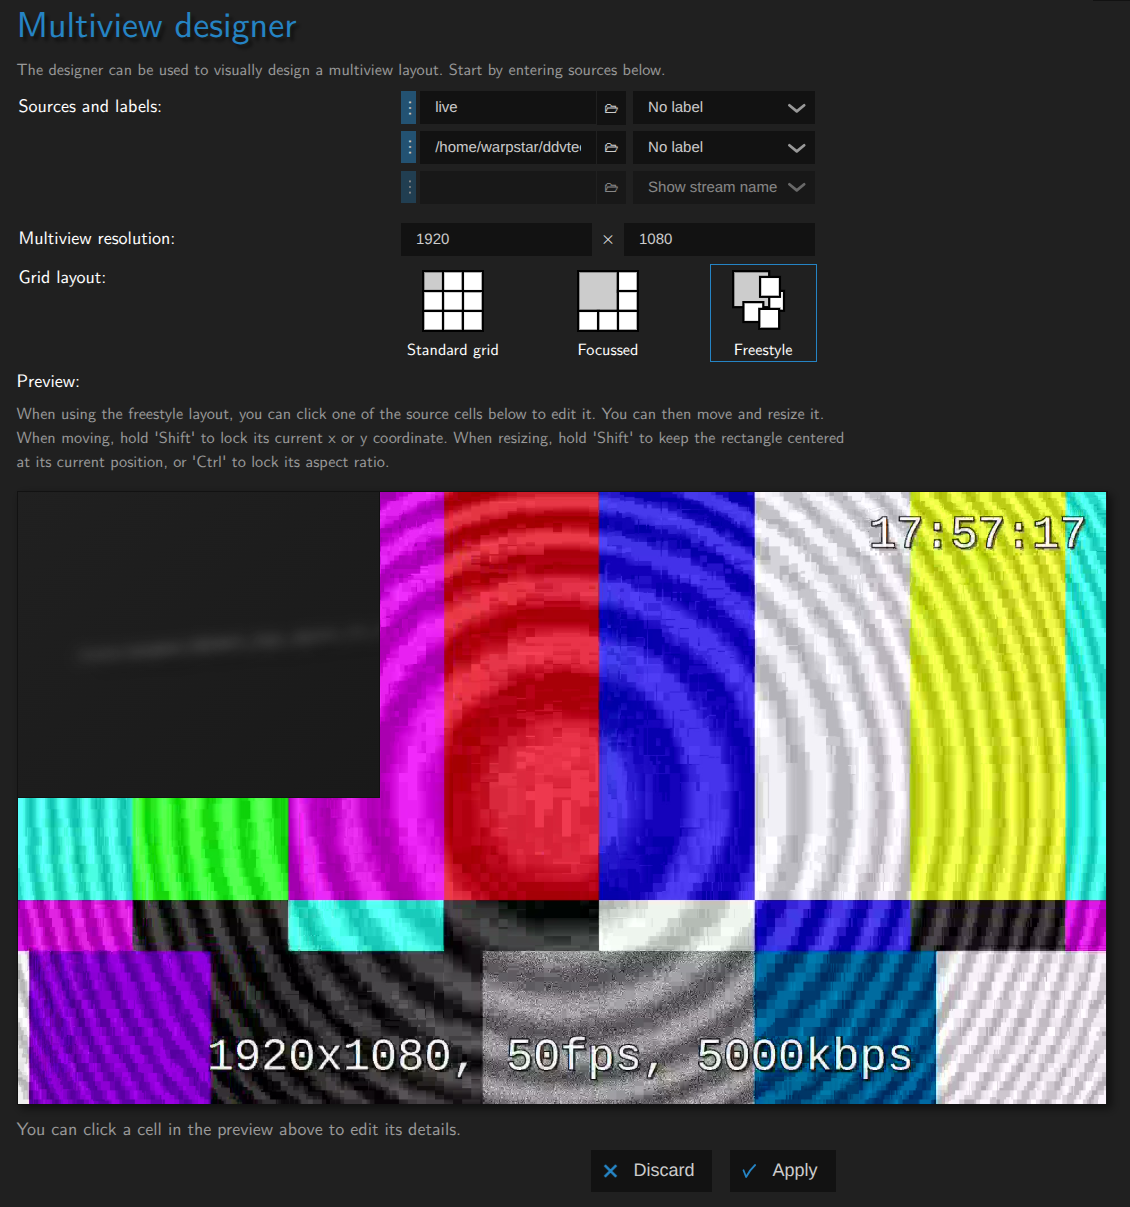
To set up a composer create a new stream and set the source to compose or multiview.
You should see the following screen appear:
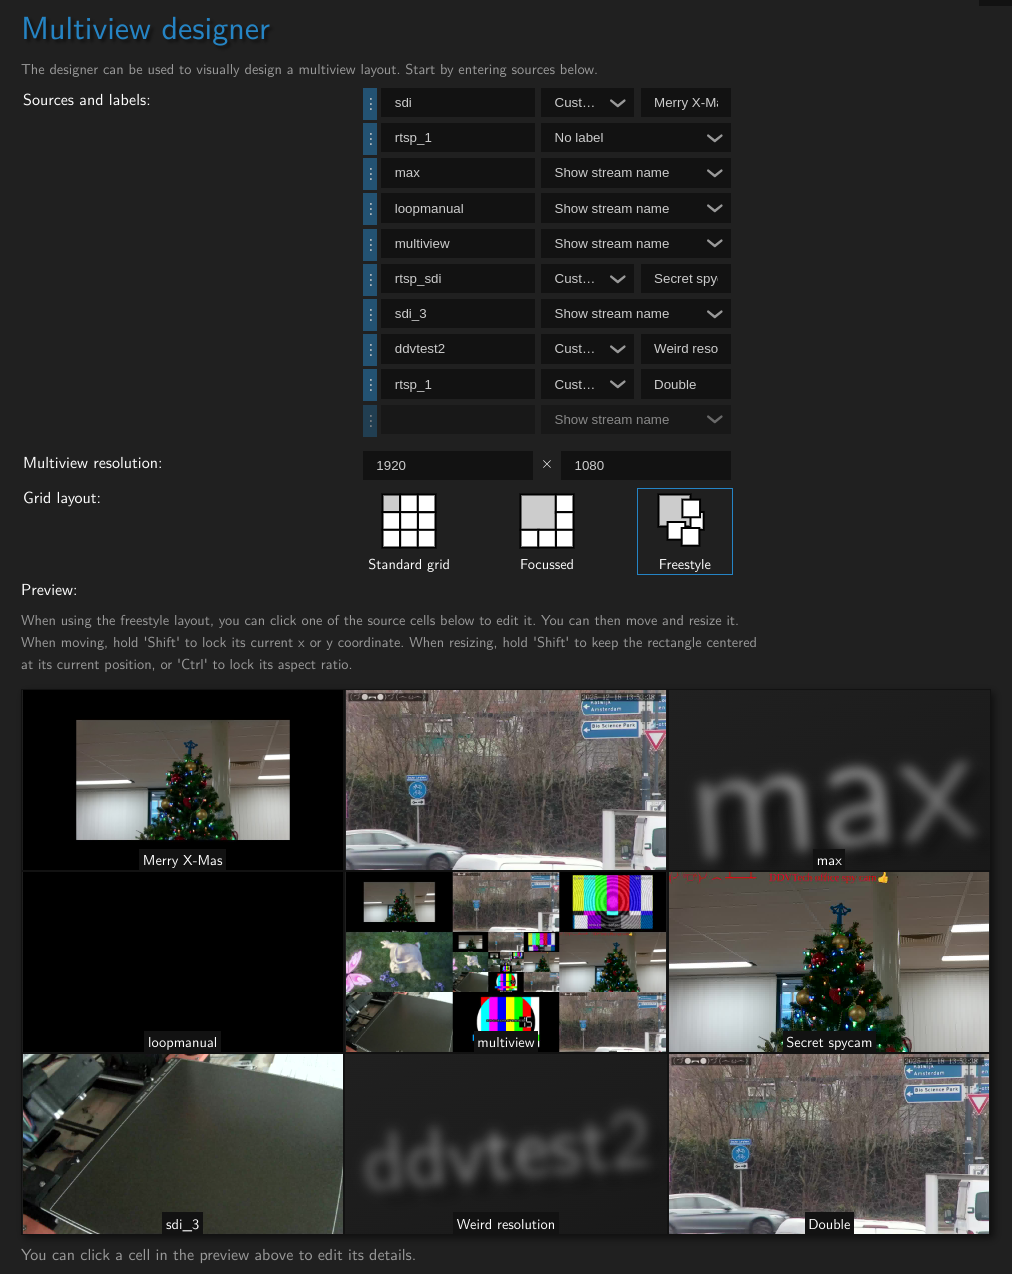
The majority of your time will be spend in the designer. You can set up the following:
- The video sources to use
- Any custom text that should be shown
- Positioning
- Scaling settings per source
- Aspect ratio setting per source
Start by filling your sources, you can use a stream name as a source for a stream input or an PNG (RGNA encoded) or a still image/background
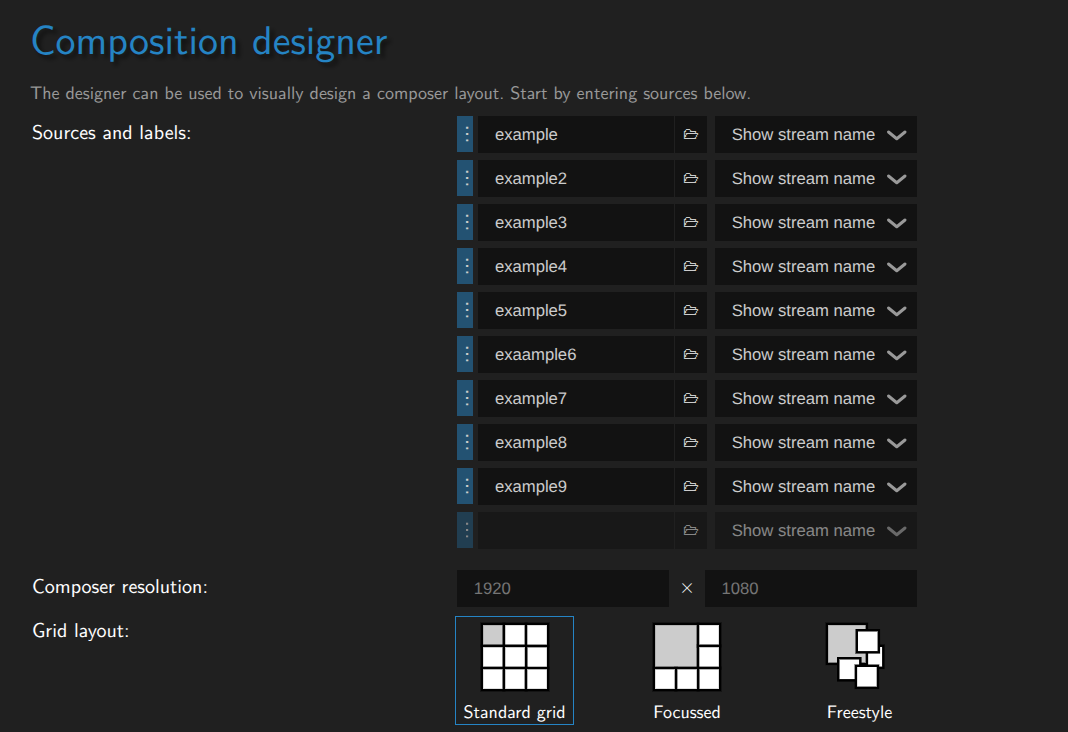
Once you've set the sources, you can set the positioning. You can either use the Grid or Focus defaults, or use Free-design to completely customize it to your liking:
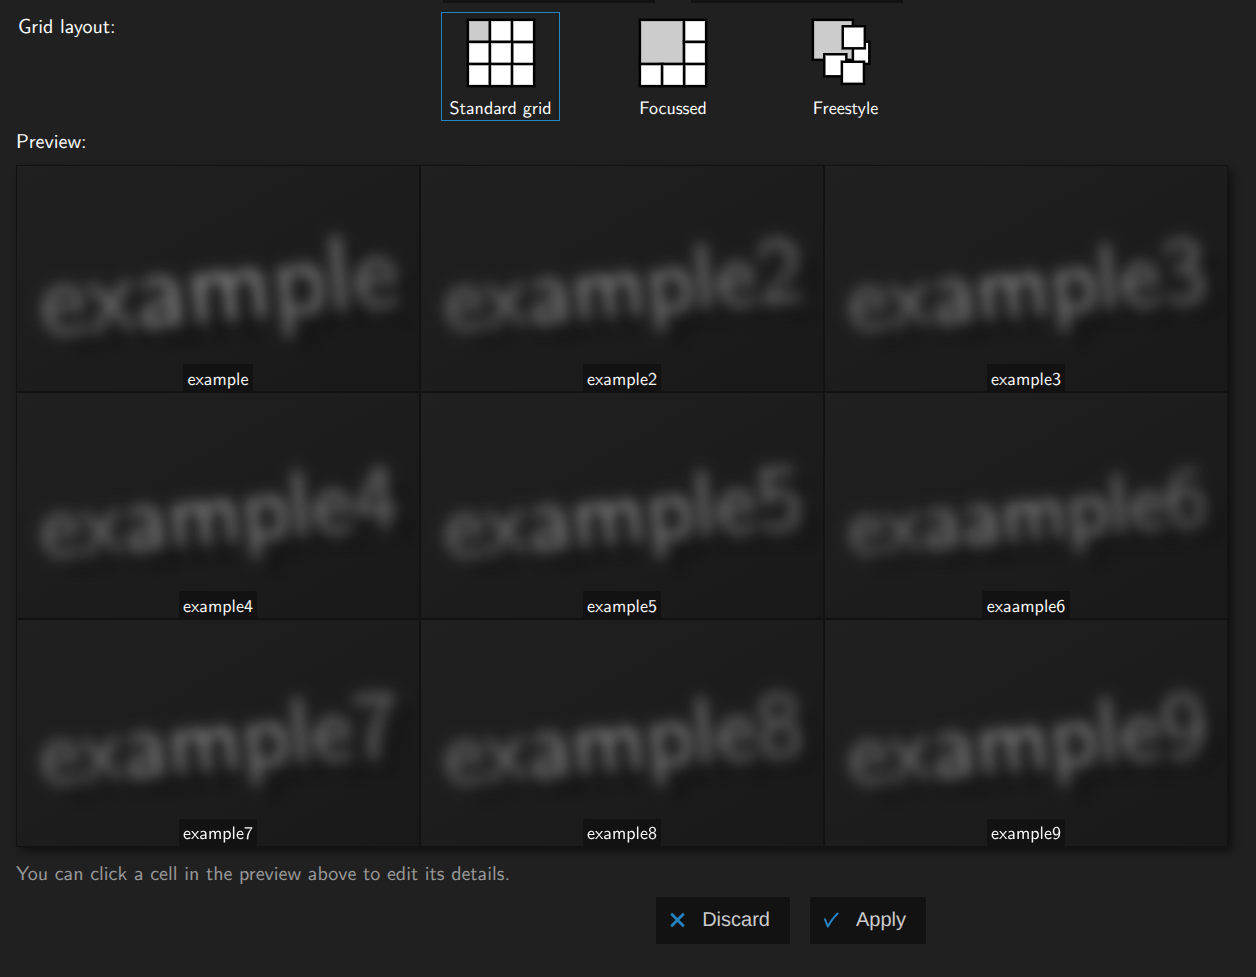
If any sources are set up to have a JPEG track this will be shown here. Otherwise the name of the source will be shown.
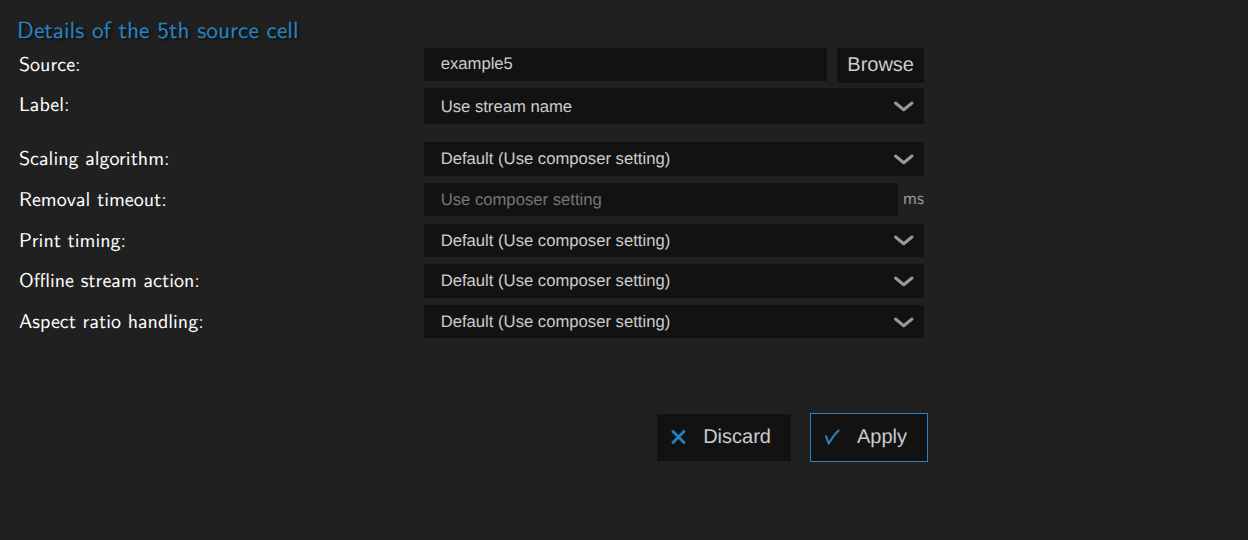
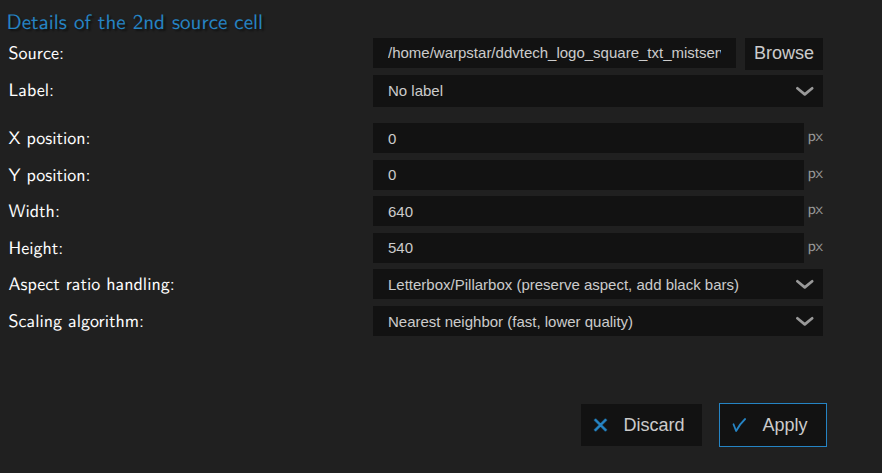
Finally you can click on any cell, no matter what layout you're using to set up specific scaling and aspect ratio handling options:
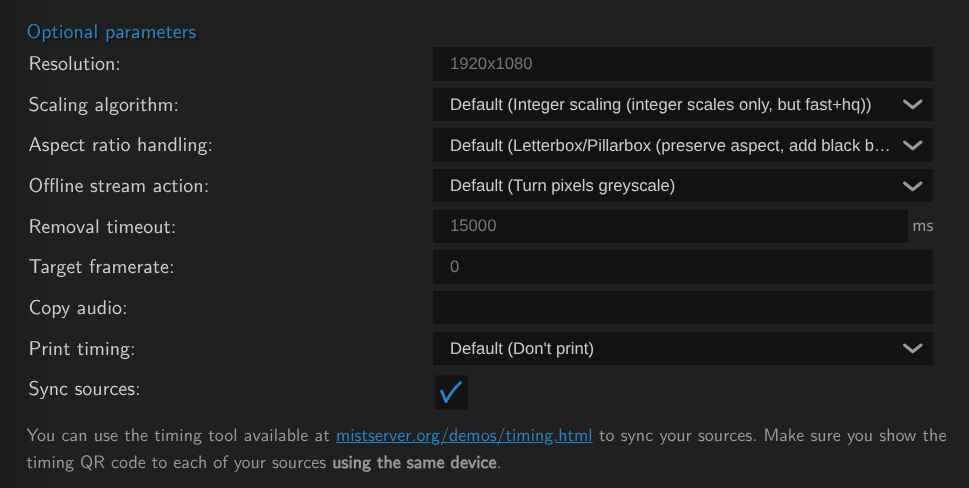
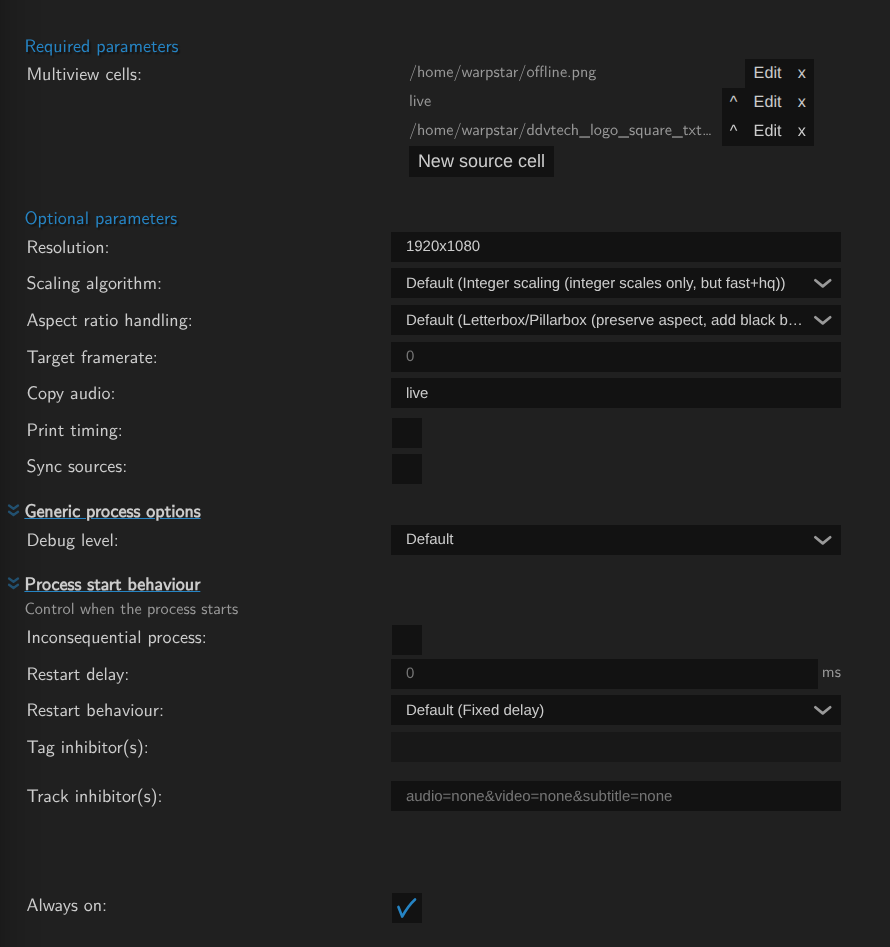
Optional parameters
Optional parameters can help you add audio to the composer, set the defaults for scaling and aspect ratio handling and set sync timing. None are required when using the composer, but knowing when to set them can drasticly improve your results. So we recommend looking over the options regardless.
We recommend setting the composer to always on for the best availability. However this does mean you will need to restart it if you change the copy audio setting.
Step 3. Adding compressed audio/video for playback or push out
The raw feeds created by the multiviewer cannot easily be used directly, you will need to add an encoder for both audio and video. Luckily this is quite easy and the reverse of Step 1.
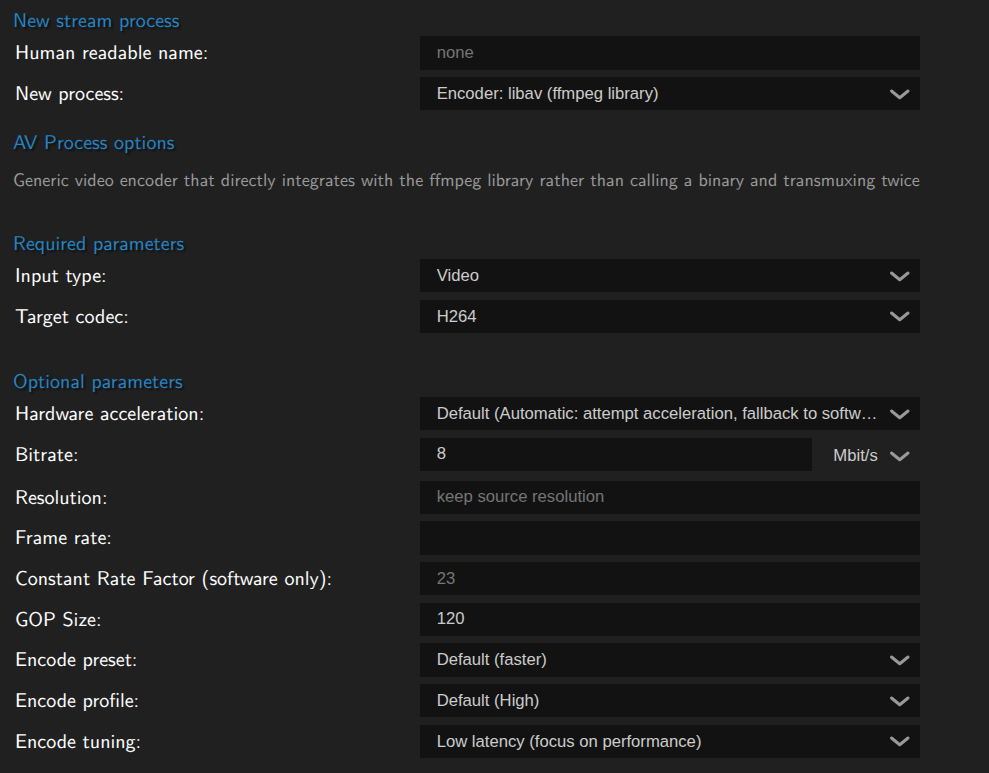
When you have finished setting up the composer go to the bottom of the options and add a stream process.
Video
Like decoding, the default for MistServer is to attempt hardware encoding and fall back to software encoding should hardware fail or be unavailable. The defaults for H264 might be a bit heavy on the bitrate, but we consider it a good starting point. Generally we would recommend start with the H264 defaults, verify it gives a good image and then start editing settings until you're happy with both the performance and the quality of the feed.
Audio
Audio can only be done through software encoding. You will want to create either Opus or AAC audio, while AAC would be recommended as the best supported protocol the MistServer default is Opus at it is assumed you generally have AAC audio. So you will most likely want to change this to AAC.
Step 4. Preview & Edit
Now you're at the step where we would recommend watching what your composer does, verify if you're happy with it and then edit the feed to your liking!
Trouble-shooting
Generally within MistServer you can always try and reset a stream by sending a stop sessions call towards it. This can be done from the streams panel through the action menu or by right-clicking on the stream itself.
Alternatively you can send a nuke stream signal to forcefully close it completely & have it attempt a clean restart. This is only recommended should a stop sessions not work, as it could in rare cases cause a stream to get stuck instead.
Preview stays black no matter what
This typically means one of two options:
- You're not feeding in
UYVYorPNG(RGBA encoded) sources to your multiview - The composer has no UYVY to
H264(orAV1) stream process
You can see the difference based on whether there is an H264 or AV1 track available, if there is then your sources are incorrect. If there is only UYVY video, you will need to add a stream process and pick a video codec.
There is no audio
Audio needs to be added as an optional parameter. We will likely change this when we have finished our planned audio mixer to allow similar mixing for audio feeds as we do for video. However currently this would mean:
- You have not set up an audio source
- The audio source has no PCM audio
- The composer has no Audio to AAC/Opus stream process
- You added the audio after the composer has activated.
This one is a bit more complex, if there is PCM audio, but no AAC or Opus you're in case 3 and need to add a stream process to and pick an audio codec.
If there's no PCM audio at all you will want to check the optional settings. If there's no stream set at the copy audio field you will need to fill that in and restart the composer by right clicking the stream name in the streams page and selecting stop sessions (case 1)
If the copy audio is set up you have either forgotten to restart the composer or you need to add PCM audio to the source (cases 2 and 4).
Some feeds are missing
This can happen in two scenarios:
- The source has no
UYVYstream process - The decode is behind
In the case of 1 you simply need to add a stream process. In the case of 2 and you're receiving the stream, it means the source is slower than real time or running into issues. If you are decoding yourself it likely means you've reached the limits of your current setup and your hardware of CPU cannot handle additional tasks.
The composed stream feels stuttery
This usually happens because of unsteady frame rate or because you're mixing a lot of multiple frame rate sources. This is partly on purpose as the composer by default will generate a frame whenever one of the sources updates. This can however be limited to a steady frame rate by setting the frame rate in the optional parameters.
Examples and usages
All of the examples below will assume that you have:
- Set up any
UYVYandPCMdecoding at the sources - Set up any
H264/AV1andAAC/Opusencoding at the composer
Due to the very flexible nature of this tool it can be used for multiple purposes. While some purposes are narrowly related they do differ slightly and certain optional parameters become key players depending on the wanted behaviour.
- Falback & always active
- Multiview / Grid
- Syncing & combining streams
- Watermarking & adding pictures
Falback & Always active
Live streaming has a very obvious limitation that if a stream isn't live, it does not exist. You will need "something" to generate a stream even if your live source is gone. The MistProcMultiview process is the best way to make sure that not only does your stream stay active, but you can replace it with whatever you want to show instead. Whether that is another live stream or simply an picture showing there are technical difficulties.
This allows you to keep your stream active to wherever it is being pushed/shown even if your source drops.
Key Settings
- You will require setting up at least 2 sources, The first one is the fallback to drop to and the last one should be the stream to show.
Always onshould be activated- Your stream sources need to be decoded to
UYVYandPCM - You will need an encoder to
H264andAACorOpus - You will need to use
free designmode to layer sources over each other.
Free design
- You will want to have the fallback be the first (highest) source
- The source to watch should be below your first source and be layered on top of it.
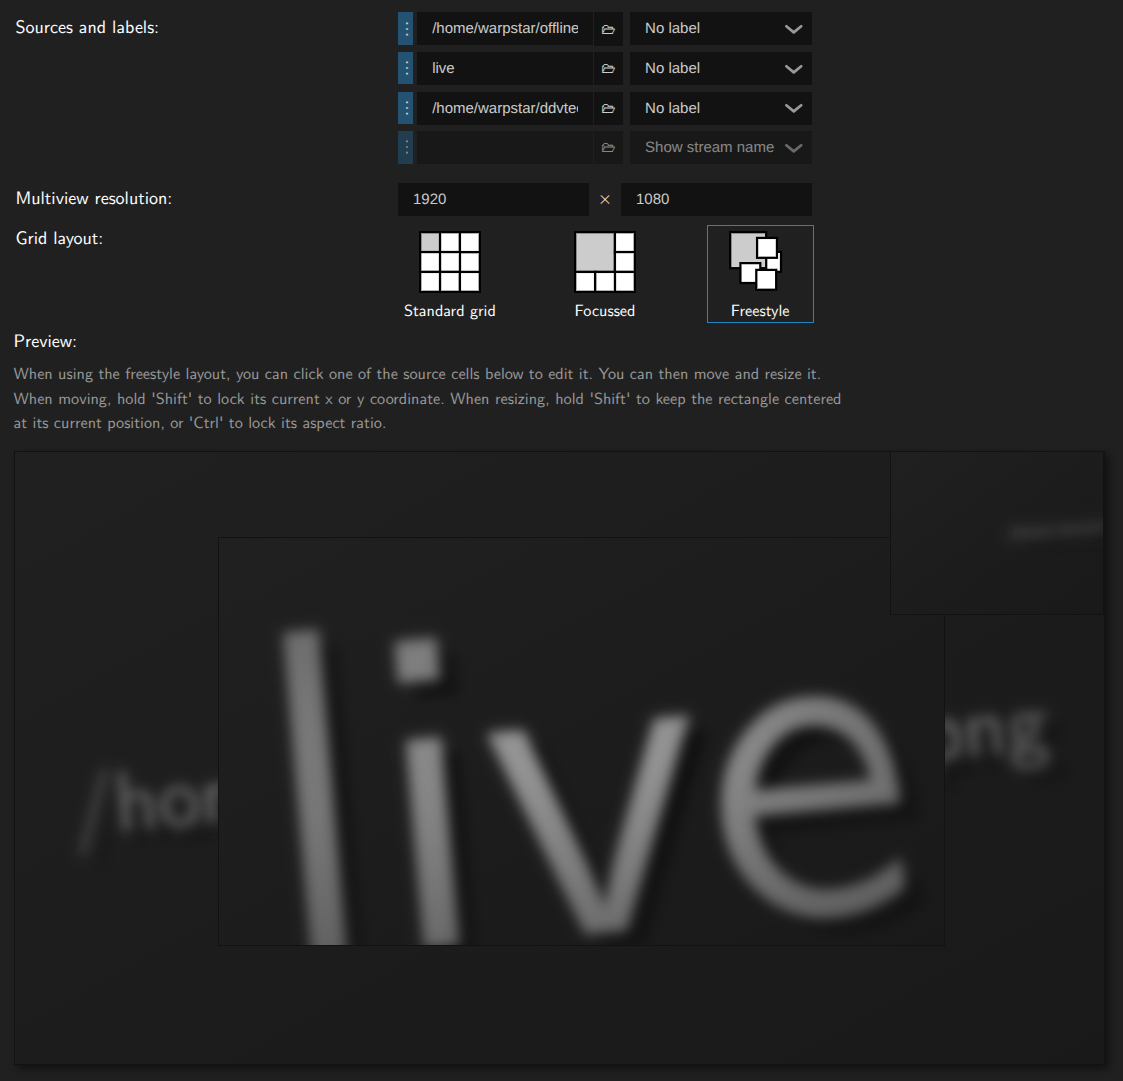
For this example we have only done a very small video over the fallback picture, we recommend filling the entire stream generally.
Once set up the stream will become available instantly with the stream just showing the PNG:
Then whenever the stream live in this case comes online the stream will add the video and audio of that stream:

Whenever the live stream goes offline or loses connection just the pictures will be shown again, keeping the stream live in the process.
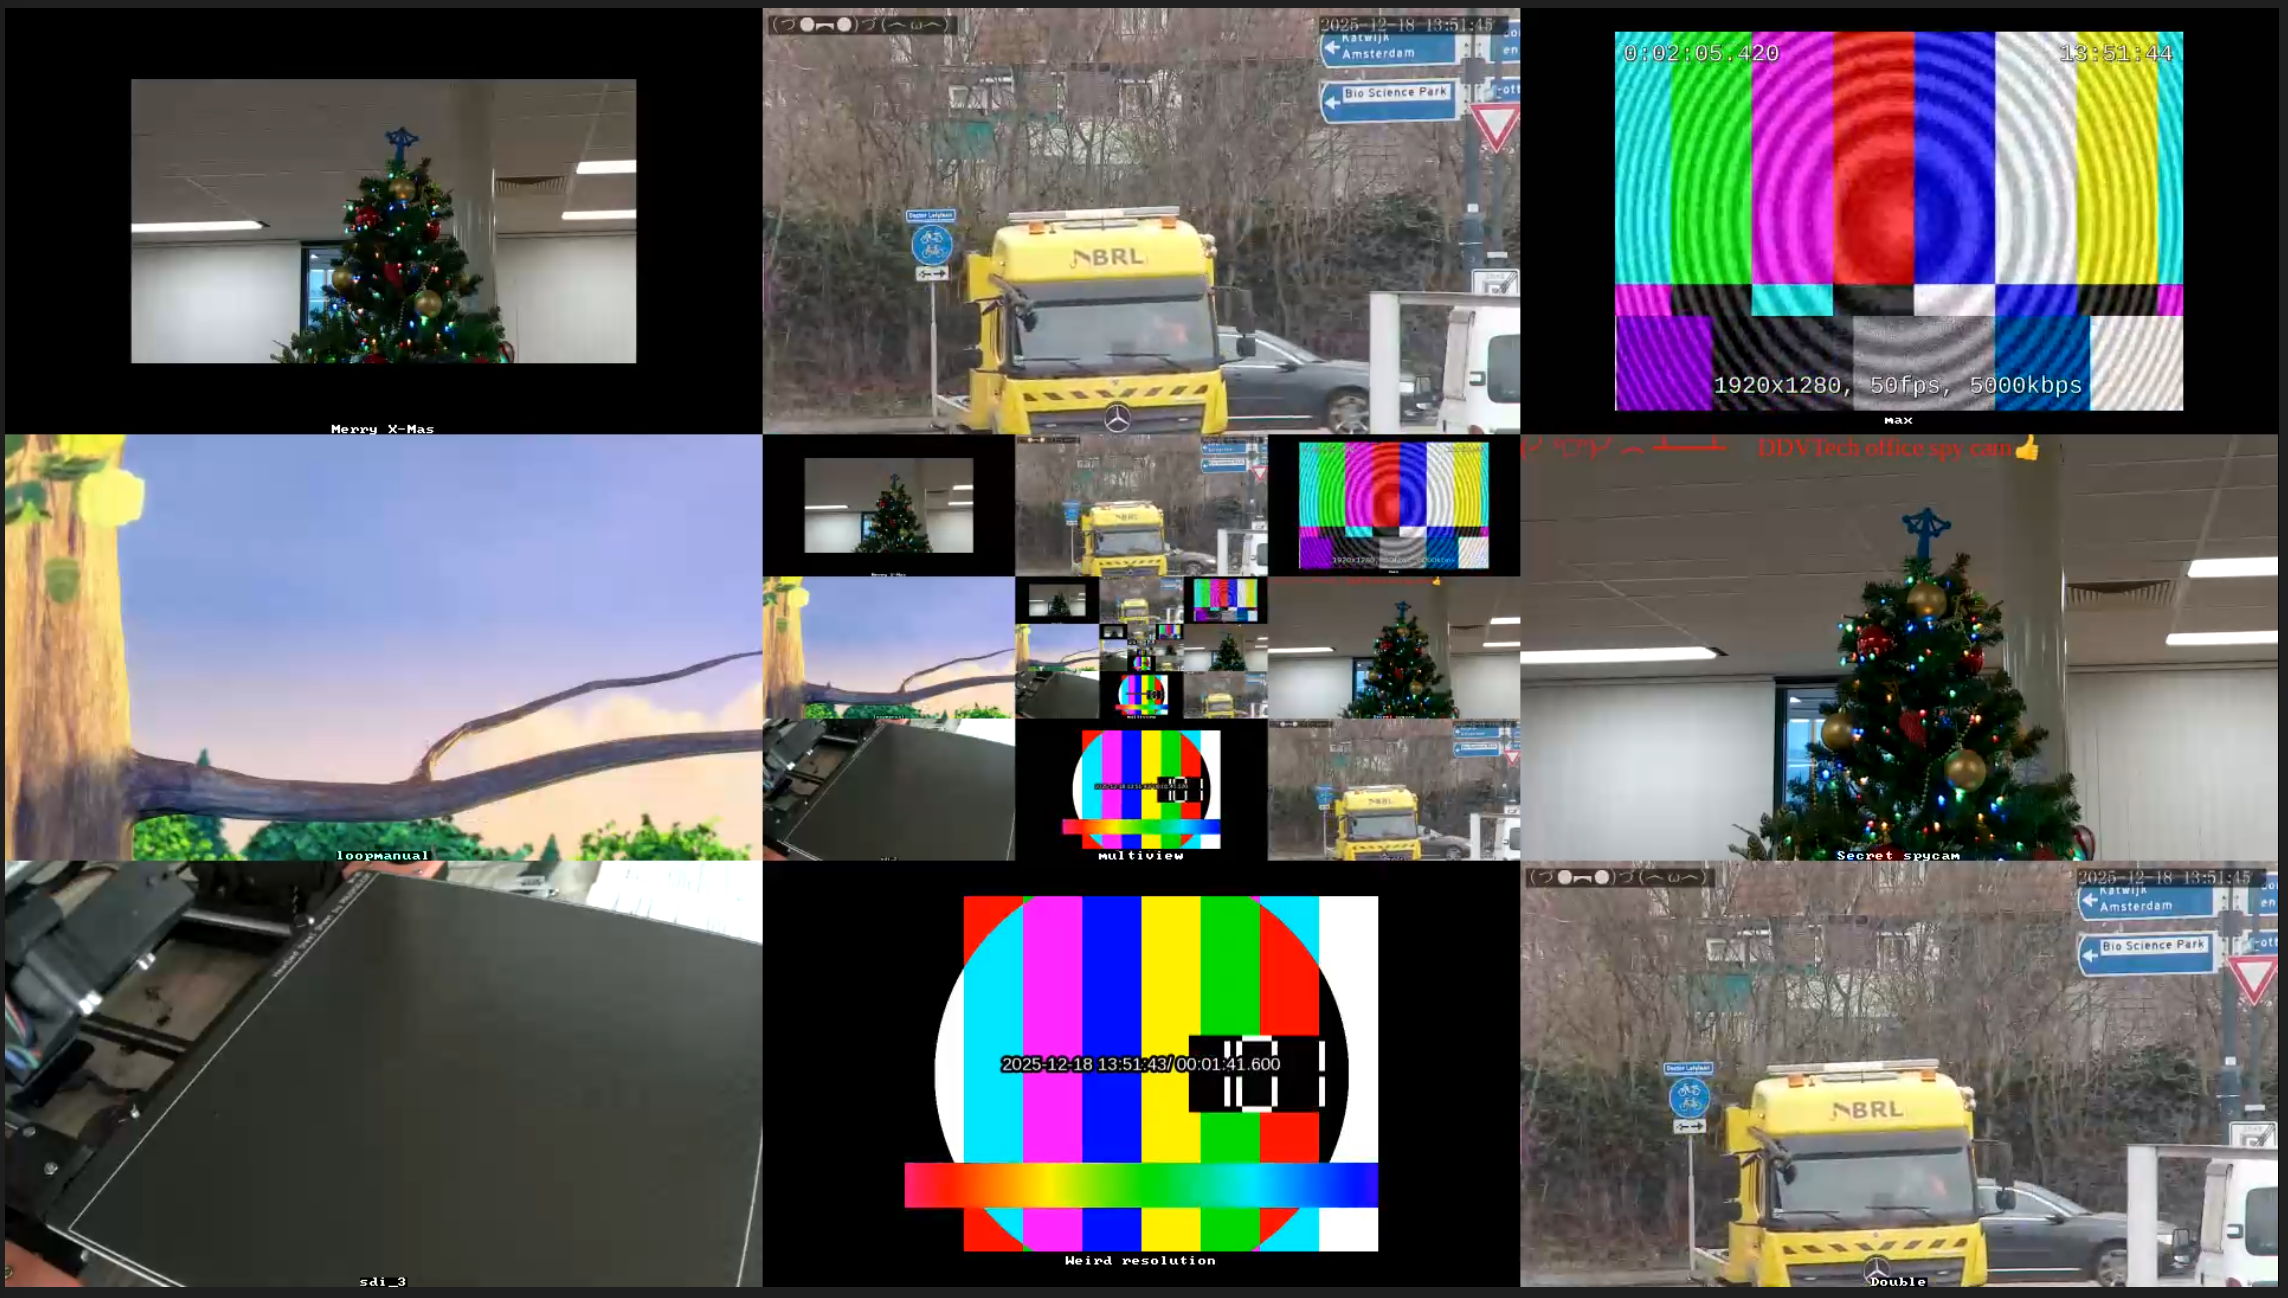
Multiview / Grid
Creating a grid out of multiple streams allows you to create a monitoring stream that can watch multiple processes while not overloading your browser with opening too many streams at the same time. So this is a great method to keep an eye on multiple streams at the same time or give some sort of overview of what else is being shown/streamed.
Key Settings
- The default grid makes things easiest, focus or design are options as well
- Your stream sources need to be decoded to
UYVY - You will need an encoder to
H264to watch the grid back in the browser - You can optionally name/label streams to keep track of their names or keep notes
This was the first purpose the MistProcMultiview was made for and is the easiest to set up. All you need to do is add several sources, label them and possibly design how the grid should look like.
For adding/removing/compositing we recommend opening the designer, it makes the task much easier. You can even add the stream you are creating, in that case the previous frame will be shown here.
Finally you can watch it in your preferred browser/player:

Syncing & combining streams
This tackles a big problem in streaming: How do I make sure my streams are synced up? It becomes especially important if you show both sources at the same time and one of the two looks to be behind. In order to make this much easier we've added ways for you to sync up streams. One is automatic that will require showing a changing QR code to both feeds, the other would be manually using timing information shown within the feeds themselves.
Key Settings
Sync sourcesneeds to be turned on for automatic syncingPrint timingcan help if you're attempting to do things manually, or want to verify the syncing has been done correctly- A single device needs to show the same QR code to both feeds, the order or timing does not matter.
- Sources will need to be decoded to
UYVYandPCM - You will need an encode to
H264andAACorOpusfor playback
How does syncing sources work
In order to sync sources you will need another device capable of showing a website displaying a QR code. This QR code changes with the UTC time, can be set to a certain frame rate to make it easier for the camera to pick up and should be shown for about 5 seconds. You can find the QR code here
The QR code looks like this:
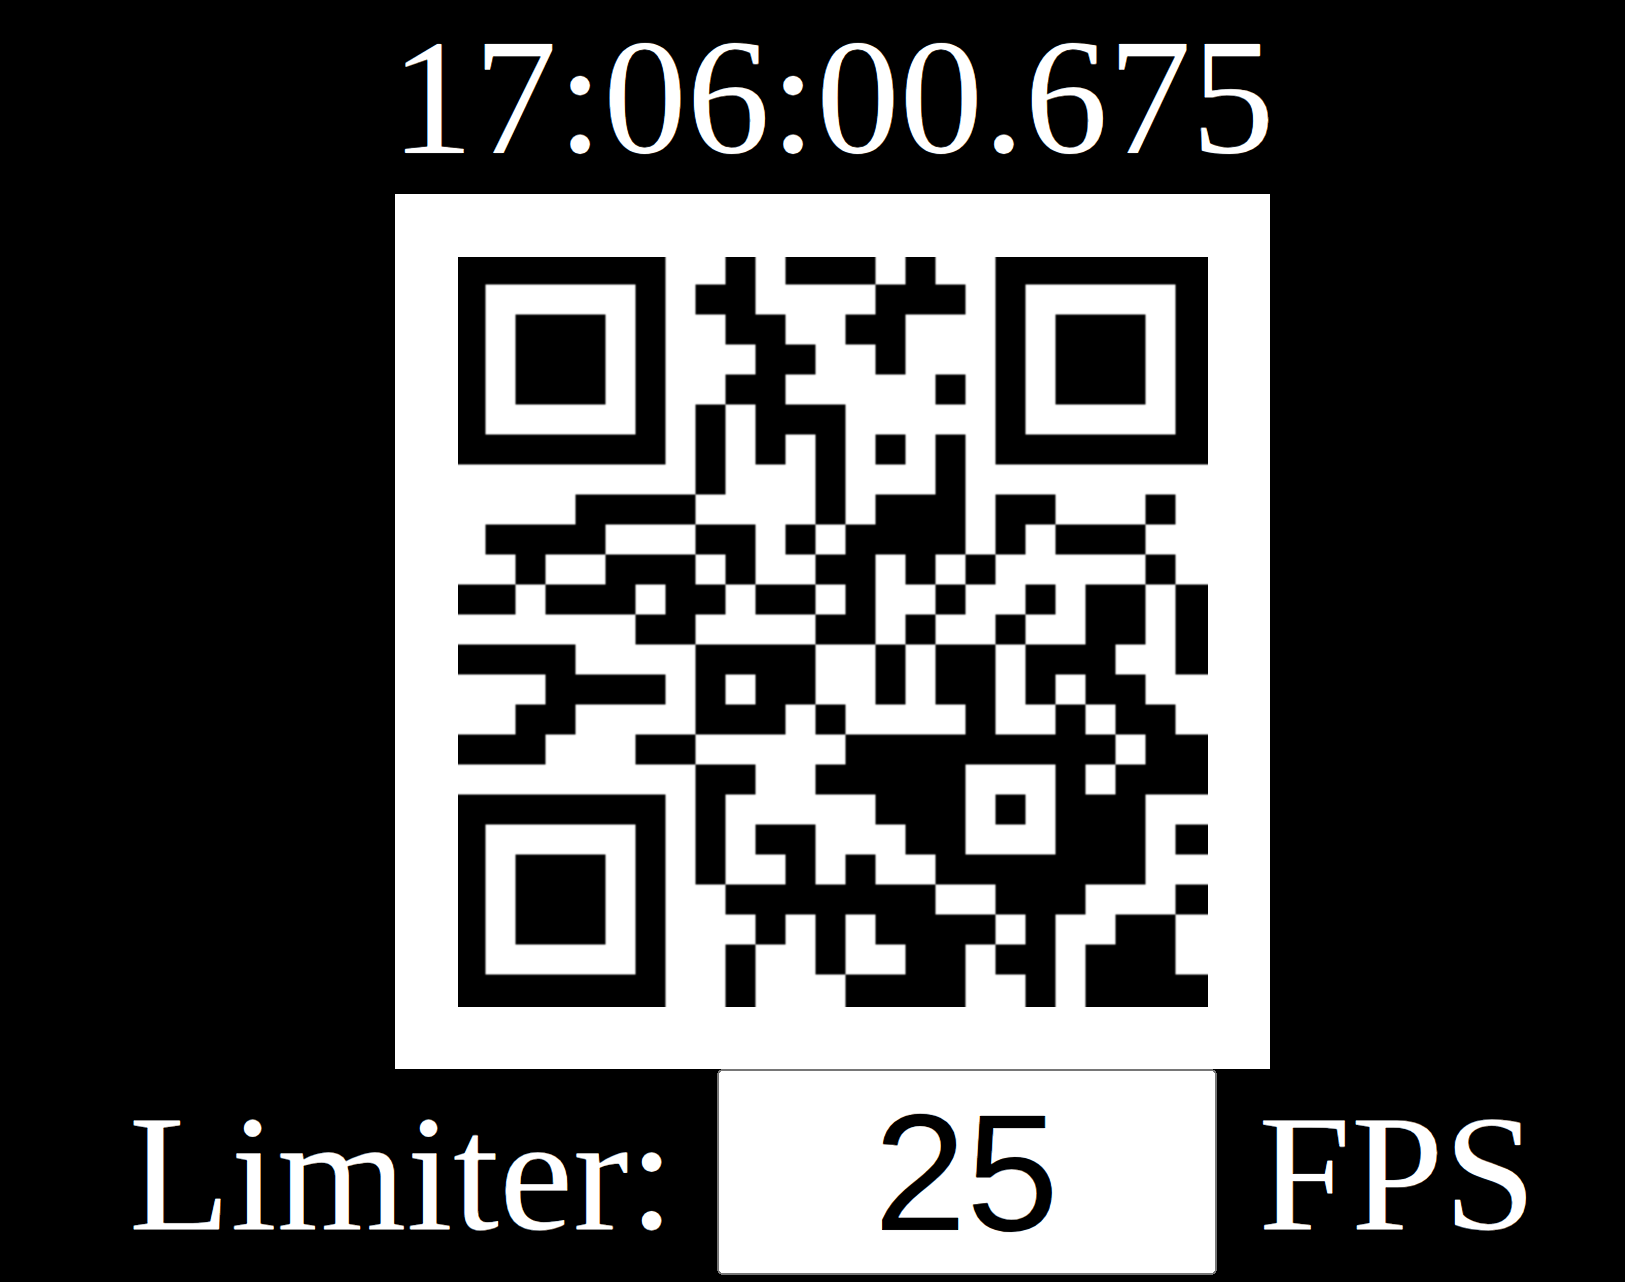
- The QR code works best at the highest FPS you can get a sharp image with.
- The QR code should never be higher FPS than that of your camera, equal at most
When shown and Sync sources is turned on MistServer will use the information shown on the QR code together with the information we've received from the source to determine the delay to the clock. This delay is also displayed in the print timing that you can activate.
Because we can read out the timing of the camera & the timing of what is on screen we can calculate the desync of the camera compared to the clock shown to the camera. This means it's very important to show the QR code from the same device otherwise timing might not end up well.
Once we know what kind of delay we're working with we can sync up all the sources to use the timing of the source most delayed to live in order to line them up.
Print timing shows both the draw time and the sync time. Draw time is the time the camera claims it is at. Sync time is the time we try to target based on the other sources and their delays.
Below is a stream created from 3 sources.
- The left source is a camera streaming using RTMP
- The top right source is the same camera sending out using SRT
- The bottom right source is a webcam capturing the QR code
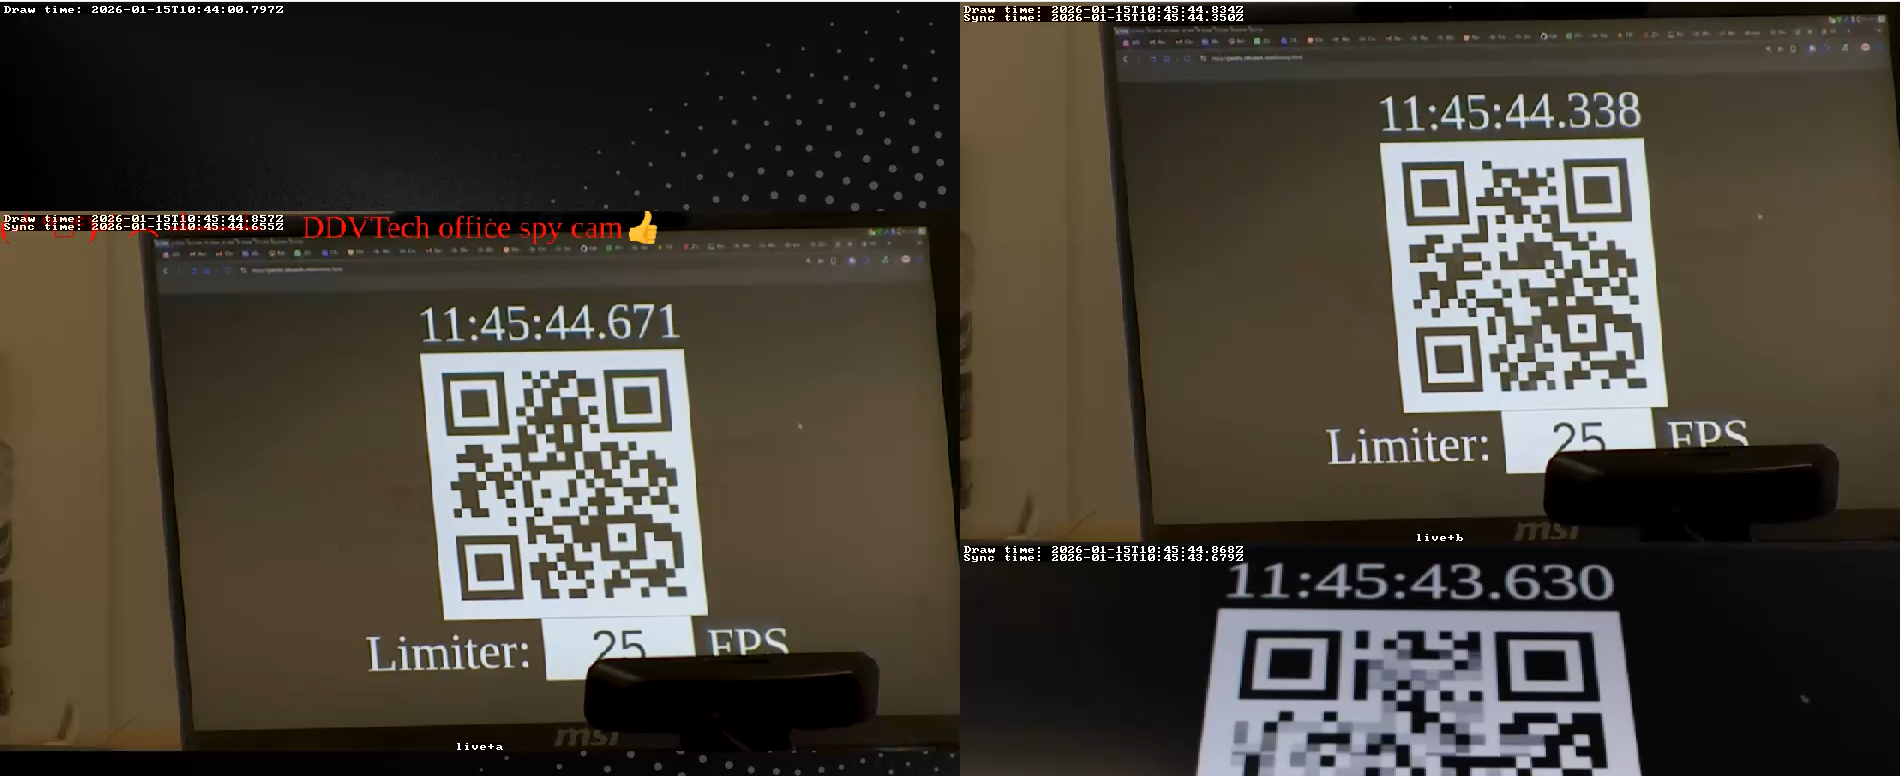
Before the sync you would see that all cameras are close to each other. This isn't a big surprise as they're all streaming to a LAN source. However this can still be much better.
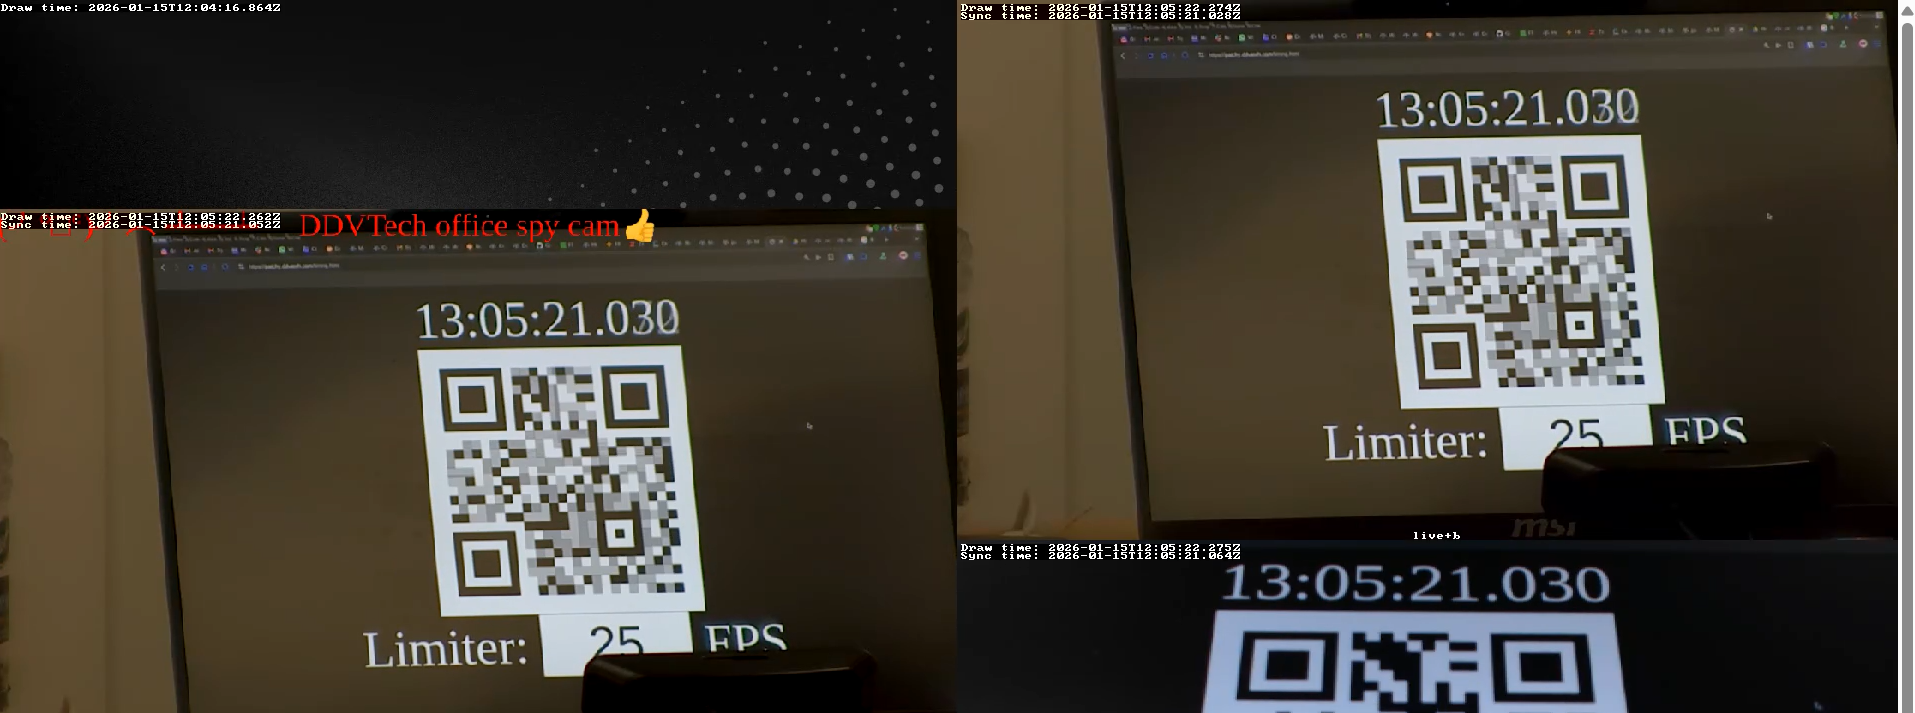
After showing the QR code the streams should quickly sync up. Generally this takes about 5 seconds per source to complete. However should you determine the syncing isn't perfect yet you can show the QR code again at any time to resync all the sources, as long as the sync sources option is activated any timing QR code passing by will be used to update and improve the sync.
- The higher the frame rate the easier syncing becomes as there's more points available to sync the feeds towards
- The fps on the QR code does not need to match the FPS of the camera.
- The fps on the QR code should not exceed the FPS of the camera, that could make the QR code blurry and not take effect.
- Making the QR code bigger does make it easier for MistServer to process & use it.
- If you deactivate
sync sourcesthe streams will jump to their most live point, making them desync again. - You do not need to have
print timingin screen in order to work, but it is recommended for manual adjustments
Manually syncing
Manually syncing will allow you to set up the delay per source. This however isn't fully specced out and will be added once it is been added to the Multiviewer.
Watermarking & logos
Watermarking & adding logos can be done quite easily by just overlaying the picture on top of another source. The trick here is that your watermark or picture is the very first source for the Multiviewer. A good thing to know is that if you make any edits to the PNG these will take affect the next frame of the stream, so you can change/update the picture and update the stream live without needing to restart it.
Key settings
- Your watermark/picture needs to be the topmost source
- Your PNG needs to be in RGBA pixel format
- Your other source should be decoded to
UYVYandPCM - You will need to encode to
H264andAACorOpusfor browser playback
Adding a picture
To add a picture you only need to add the path to the PNG as a source & determine the size & location it should get within the stream. This can be done very easily through the designer.
Once added, you most likely need to change the aspect ratio and scaler to determine how the picture should be scaled. In most cases you will want to keep the aspect ratio otherwise the picture will look distorted. Should you update the picture on the actual location that will be changed within the stream as well.
While the scaler will claim it will insert black bars to make sure it fits the frame, these are made invisible should there be something "below" the picture. So our picture only blocks the stream where the actual picture is drawn, any alpha or black bars have been removed from the end result.