Live streaming with OBS Studio
This post will cover the basics of live streaming and using OBS Studio to achieve this. We have noticed that most beginners are confused by how to properly set up a live stream, as most questions we receive are questions on how to get their live stream working.
What should you know before we begin
RTMP
Most popular consumer streaming applications use RTMP to send data towards their broadcast target. The most confusing part for newer users is where to put which address, mostly because the same syntax is used for both publishing and broadcasting.
Standard RTMP url syntax
rtmp://{HOST}:{PORT}/{APPLICATION}/{STREAM_NAME}
| Element | Meaning |
|---|---|
{HOST} | The IP address or hostname of the server you are trying to reach |
{PORT} | The port to be used; if left out it will use the default 1935 port. |
{APPLICATION} | This is used to define which module should be used when connecting, within MistServer, this value will be ignored or used as password protection. The value must be provided, but may be empty. |
{STREAM_NAME} | The stream name of the stream: used to match stream data to a stream id or name. |
This might still be somewhat confusing, so I will make sure to give an example below. You can use these values when you setup a stream through the MistServer management interface. Once you've configured a stream in MistServer you can use the same values in OBS.
| Element | Example value |
|---|---|
{HOST} | 192.168.137.26 |
{PORT} | 1935 |
{APPLICATION} | live |
{STREAM_NAME} | livestream |
RTMP URL to use when pushing to MistServer
Full URI (URI and Stream key in one address)
rtmp://192.168.137.26/live/livestream
Broken URI (URI and Stream key split up)
URI: rtmp://192.168.137.26/live/
Stream key: livestream
SRT
Secure Reliable Transport is getting more popularity and is often available next to RTMP. SRT has the benefit of allowing easier multibitrate pushing and has build in reliability for less optimal streaming environments. If you have a good connection you won't see much benefit or difference compared to RTMP. The biggest difference is that by default SRT uses a port per stream, however using the streamid parameter and setting up SRT in the protocol panel allows you to use it as a push input like RTMP.
Standard SRT url syntax
srt://{HOST}:{PORT}({?streamid=STREAMNAME}&{parameters})
| Element | Meaning |
|---|---|
{HOST} | The IP address or hostname of the server you are trying to reach. If you notice the host name not working we recommend using the IPv4 address of the server instead. |
{PORT} | The port to be used; There is no default SRT port so it needs to be set. MistServer does activate a SRT protocol on port 8889 by default however. |
{STREAM_NAME} | The stream name of the stream: used to match stream data to a stream id or name. For SRT streams this is done through the streamid parameter. This can be done as an URI parameter or through the optional parameter options at the bottom. |
{parameters} | SRT has SRT specific parameters, which can be set either as URI parameter or through the optional parameter options at the bottom. |
A full list of optional parameters that can be used is too big for a simple introduction. If you wish to know more we would recommend looking at the how-to guide specifically for SRT.
Until then the most important to know is streamid, this allows you to select a stream to push towards, which allows you to use SRT like RTMP and push towards a single port using streamid to match stream name within MistServer.
Once again, this might be overwhelming. Thus below is a table of what this would be using the MistServer defaults.
| Element | Example value |
|---|---|
{HOST} | 192.168.137.26 |
{PORT} | 8889 |
{?streamid=STREAMNAME} | livestream |
SRT URI to use
srt://192.168.137.26:8889?streamid=livestream
What steps we need to take
So now that we got the basics for RTMP and SRT, what do we actually need to live stream to MistServer?
- A running MistServer
- OBS installed
- A video source (we’ll use a live video stream in this example)
Below I will explain step by step, how to setup MistServer and OBS. Once you've followed these steps you'll be able to stream from OBS into MistServer. Then you can start streaming and broadcast to the world!
- Set up MistServer to be ready to receive a stream
- Set up OBS to push towards MistServer
- Start the push
- Preview the stream to verify it works
- Optional settings to improve OBS output
1. Setting up MistServer
Only allowing a single address to push the stream
You can set the correct setting in MistServer when creating or editing a stream using the stream panel in the left menu.
- Stream name: "
livestream" no surprises here, both servers need to use the same stream name in order to make sure they are both connecting the stream data to the proper stream name. - Source: "
push://192.168.137.19" MistServer needs to know what input will be used and where to expect it from. Using this source will tell MistServer to expect an incoming push from the ip192.168.137.19. This will also make sure that only the address192.168.137.19is allowed to push this stream, so make sure to connect over the given address!.
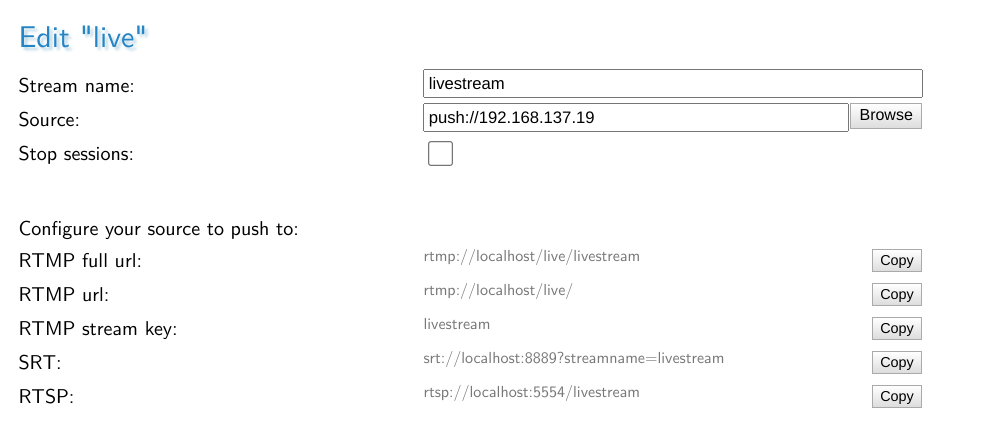
It's important to note that the
configure your source to push towill tell you how you would connect to MistServer based on your current connection method. It does not take into account if your address is cleared for pushing!
Allowing all addresses to push the stream
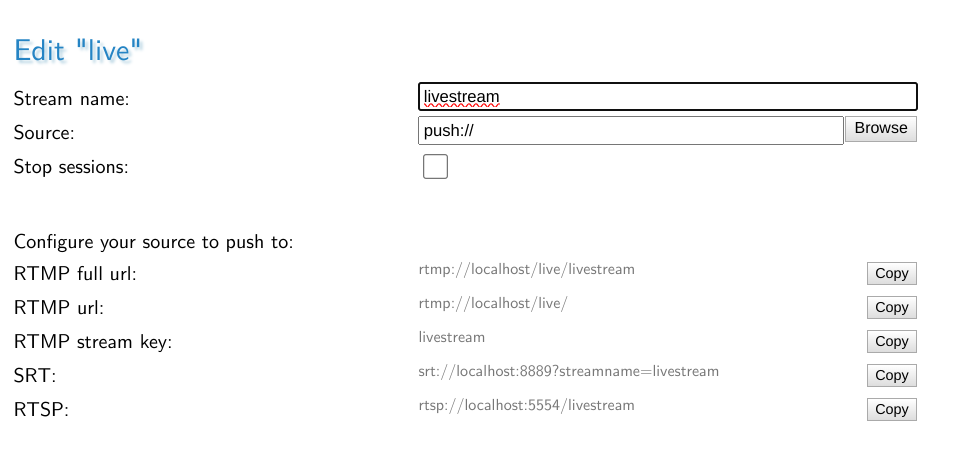
This is something to use either for testing or if you plan to set up stream tokens. This allows you to set the push acceptance rules somewhere else, or simply allow anyone to push the stream, which is easier for testing.
- Stream name: "
livestream" no surprises here, both servers need to use the same stream name in order to make sure they are both connecting the stream data to the proper stream name. - Source: "
push://" MistServer will skip any checks for white listing and allow anyone that has a matchingstream nameto push the stream.
2. Setting up OBS
You can use the defaults of OBS. They won't be the "best" settings, but in general they should provide you with a working live stream. The only thing you truly need to set up is the target for OBS to push towards. Once you've set this up you can consider it done, however we recommend having a look at the more advanced OBS settings as well.
RTMP
You can find the OBS settings at the top menu under "File > Settings". You will need the stream settings to set up the push towards MistServer.
- Service:
Custom...This is the category MistServer falls under. - Server:
rtmp://192.168.137.26/live/Here we tell OBS to push the stream towards MistServer which can be found at192.168.137.26. Note that this url includes the application name. - Stream key:
livestreamHere you will need to fill in the Stream id, which is the stream name we used in MistServer.

SRT
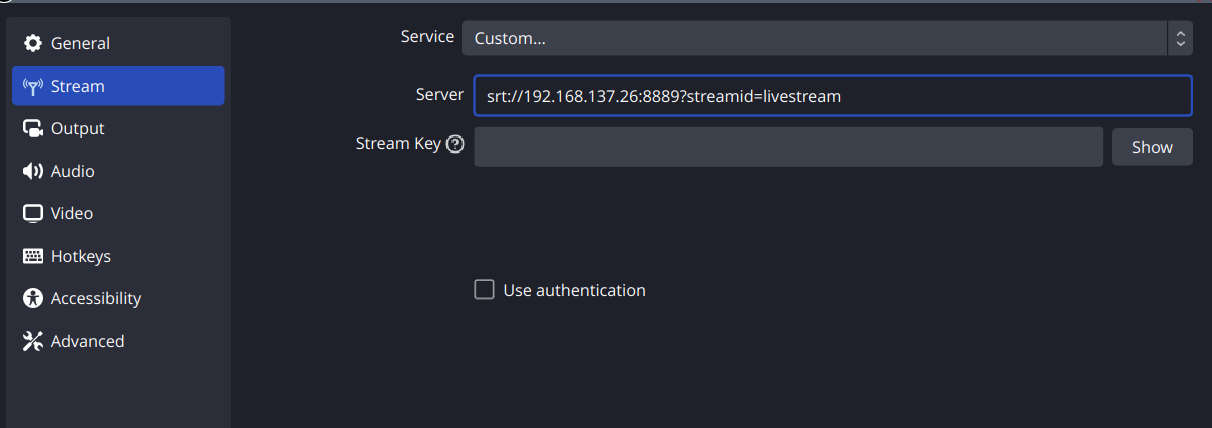
Same setup as RTMP, at the top menu under "File > Settings" find the stream settings and set up the following to push towards MistServer.
- Service:
Custom...This is the category MistServer falls under. - Server:
srt://192.168.137.26:8889?streamid=livestreamHere we tell OBS the full SRT address andstreamidif applicable. In this case we will be using the push input of MistServer so port 8889 andstreamid=streamnameare what we want.
3. Start streaming
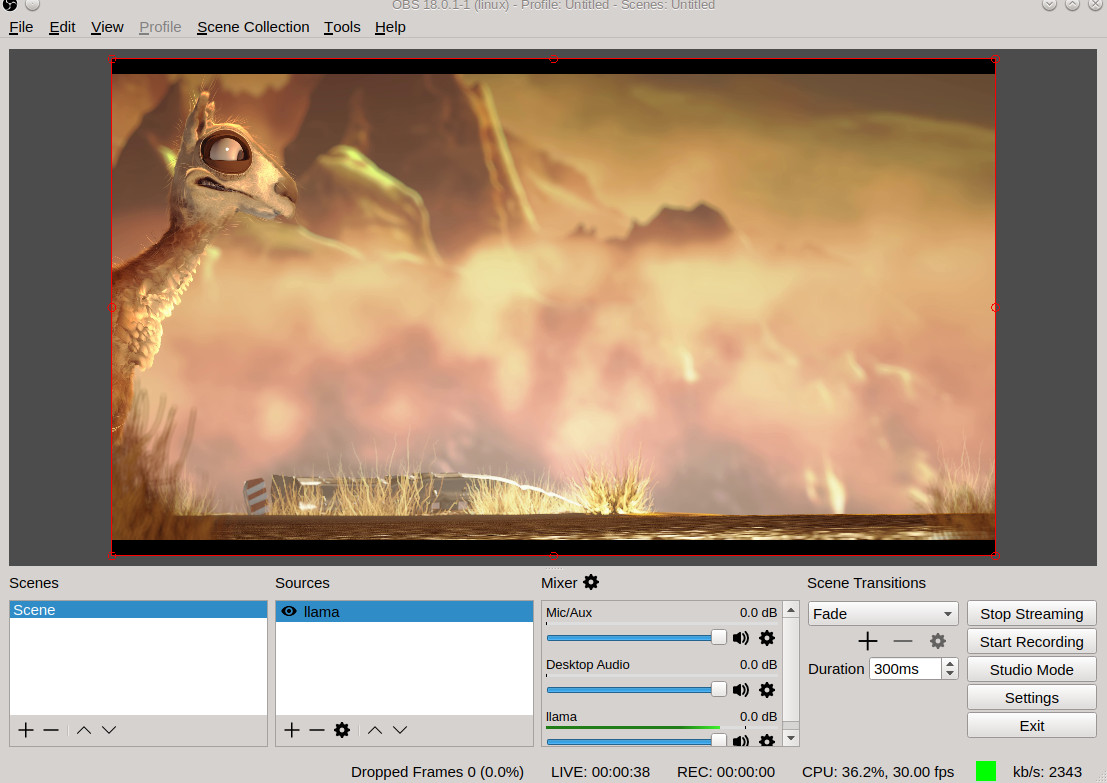
Now that the settings for MistServer and OBS are done, we are all good to go. To start streaming all we will have to do is press the Start Streaming button in the bottom right corner of OBS.
4. Preview the stream
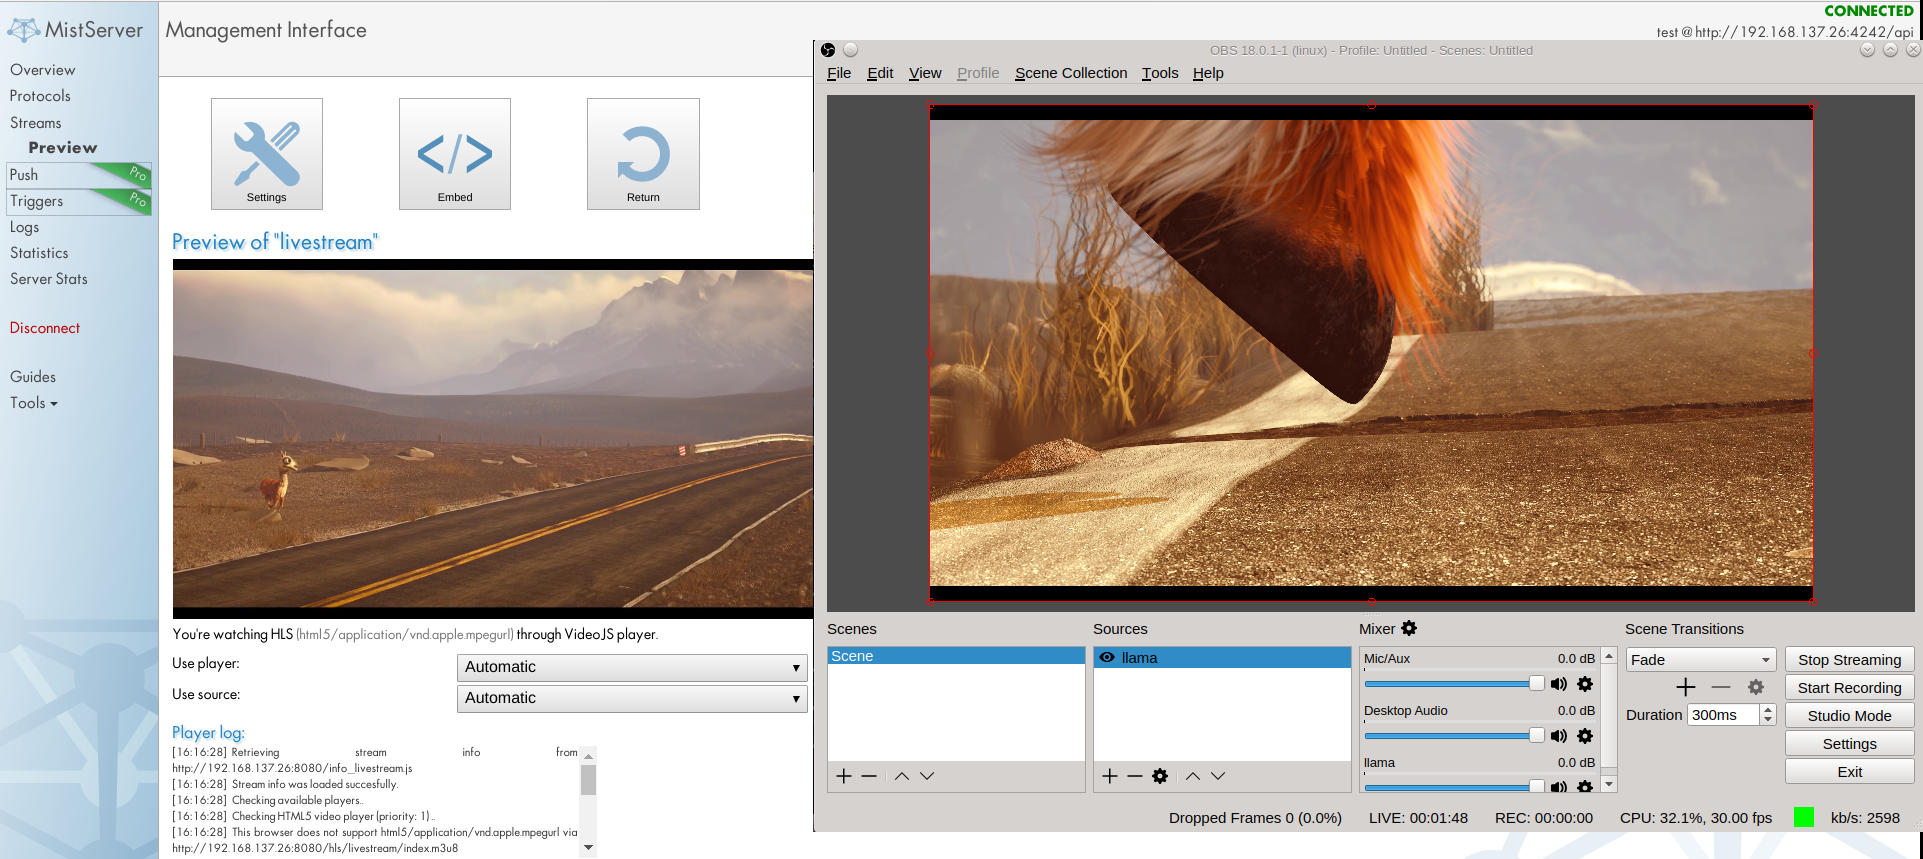
Now that we are pushing the stream you should see the status change within MistServer from Unavailable to Standby and then to Active. Unavailable means the source is offline, Standby means the source is active and playback might be possible already and Active means the source is active and playback is guaranteed on all supported outputs.

To see if the stream is working we can click Preview and get to the preview panel, if everything is set up correctly we will be seeing a stream appear soon enough.
5. OBS advanced settings (Optional)
This is all an extension of chapter 2. While this isn't necessary to push a live stream into MistServer it might be important for you to improve the stream and for this you will need the OBS advanced output settings.
You can get to these settings by selecting advanced output mode at the output settings within OBS.
The basic stream settings will produce workable video in most cases, however there's two settings that can hugely impact your stream quality, latency and user experience.
- Rate control: This setting dictates the bitrate or "quality" of the stream. This setting is mostly about the stream quality and user experience.
- Keyframe Interval: Video streams consist of full frames and frames containing only changed parts relative to the full frames. This setting decides how often a full frame appears and heavily influences the latency.
First off, check for recommended stream settings!
Before you read up on any of the options below and start messing around, ALWAYS check whether the platform you are about to stream towards has recommended stream settings. If they do copy those and use them. A platform will generally know better what will and will not work when pushing towards them and using those settings will save you a lot of headaches in the long run!
Encoder choice
OBS will come with several audio and video encoders and in general there is no real "best pick" here. What is important to know however is that some are software encoders while others are hardware encoders.
Software encoders generally will work, however they will cost you CPU and can be quite taxing. In general they are more accurate than hardware encoders. A good example of a software encoder is x264
Hardware encoders are encoders using other hardware than the CPU to encode. A good example of a hardware encoder is NVIDIA nvenc which uses a NVIDIA graphics card.
You will have to test the difference yourself, but in general we would recommend trying the hardware encoder first. Lowering the CPU usage is never a bad idea.
Optimizing for low latency - keyframe interval
Low latency is highly influenced by the keyframe interval. As mentioned above, video streams consist of full frames and data relative to these full frames. Keyframes are the only valid starting points for playback, which means that more keyframes allow for a lower latency. Having keyframes appear often will allow your viewers to hook onto a point closer to the actual live point. However, this does come with a downside: A full frame has a higher bit cost, so you will need more bandwidth to generate a stream of the same quality compared to a lower amount of keyframes.
Optimizing for stream quality and user experience
Stream quality and user experience is mostly decided by the rate control of the stream. The rate control decides just how much bandwidth a stream is allowed to use. As you might guess, a high amount of bandwidth usually means better quality. One thing to keep in mind however is that your output can never improve the quality of your stream beyond your input, so a low quality stream input will never improve in quality even if you allocate more bandwidth to it.
With user experience in this case we're talking about the stability of the video playback and the smoothness of the video. This is mostly decided by the peak bitrate of the video. The peak bitrate of a video may rise if a lot of sudden changes happen within the video, when this is the case some viewers may run into trouble as the bandwidth required could go over their (allowed) connection limit. When this happens they will run into playback problems like buffering or skips in video playback. At the same time constant bitrate will remove peaks, but will also reduce the stream quality when a high bitrate is required to properly show the video.
Bframes - saves bandwidth at a cost
Bframes are a bit too technical to fully explain here. To keep things simple Bframes are a method to save on bandwidth by sending encoding instructions earlier or later than they actually need to be used. In general while this saves you a bit on bandwidth we recommend turning these off. The majority of players/devices will be able to handle them properly, but we've found a few that tend to mess up playback if they are present.
Balancing low latency with stream quality and user experience
As you might've guessed this is where the real struggle is, low latency and stream quality tend to increase with higher bandwidth, while user experience increases with lower bandwidth. We will always recommend playing around with the settings until you have found something you like. However to give you something to use we will share three profiles below, two will be software encoder profiles as they will always be available and one will be NVIDIA nvenc as it is very widely used.
The constant bitrate profile (x264)
This is the profile we use when we want what we consider a "normal" stream. It uses a constant bit rate, but a good mix between quality and latency. It should suit most situations, but your mileage may vary. We use the following settings:
| Setting | Value |
|---|---|
| Encoder | x264 |
| Rate control | CBR |
| Bit rate | 2500 |
| Keyframe interval | 1 |
| Use custom buffer size | Leave unchecked |
| CPU usage preset | Very fast |
| Tune | None |
| Scale | same as source |
| x264 | bframes=0 |
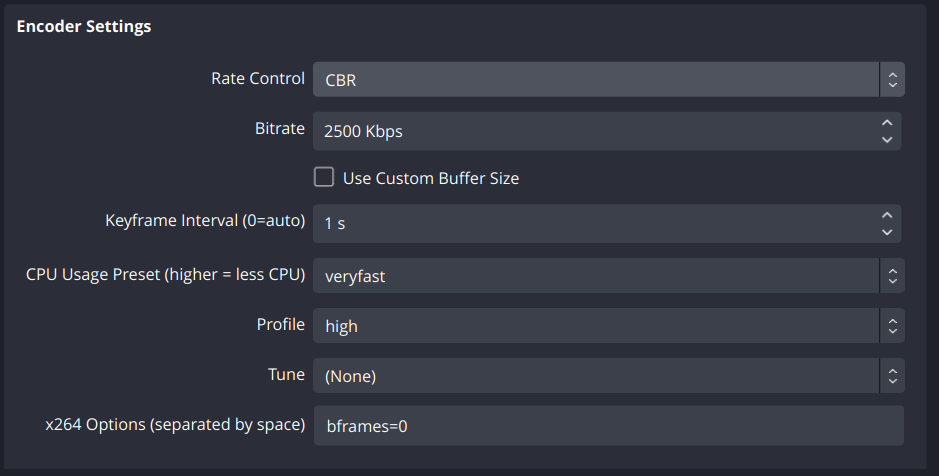
Setting the rate control to CBR means constant bit rate. This means the stream will never go above the given bit rate (2000kpbs). The keyframe interval of 5 means that segmented protocols will not be able to make segments smaller than 5 seconds. HLS is the highest latency protocol, requiring 3 segments before playback is possible. That means a minimum latency of 15 seconds for HLS. CPU usage preset very fast means relatively less CPU time is spent on each frame, thus sacrificing quality in exchange for encoding speed. Profile high means newer (now commonplace) H264 optimizations will be allowed, providing a small increase in quality per bit. We didn't set any Tune or additional x264 options for this as these options should really only be used when you know what they do and how they work.
The constant quality profile (x264)
This is the profile we use when we want a stream to keep a certain amount of quality and are less concerned about the bit rate. In practise we use this less, but I thought it handy to share nonetheless:
| Setting | Value |
|---|---|
| Encoder | x264 |
| Rate control | CRF |
| CRF | 25 |
| Keyframe interval | 1 |
| CPU usage preset | Very fast |
| Profile | High |
| Tune | None |
| Scale | Same as source |
| x264 | bframes=0 |
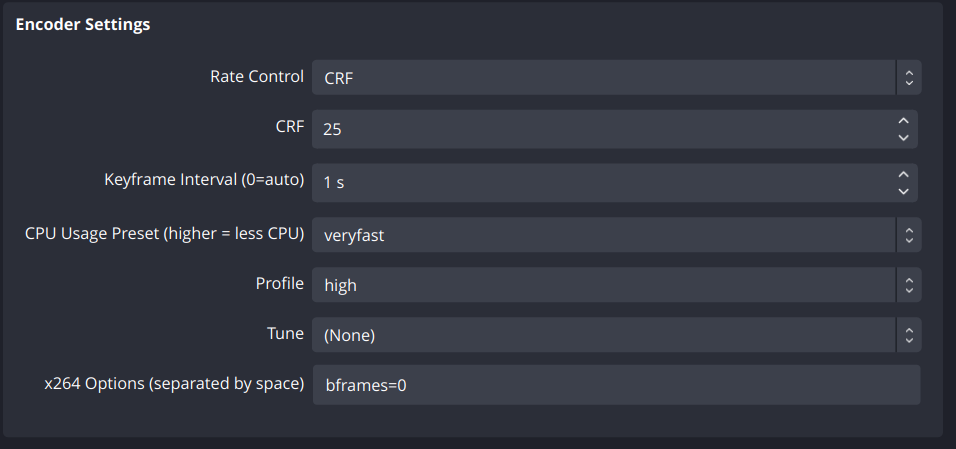
Setting the rate control to CRF means constant rate factor. This setting goes from 0 to 51, where 0 is lossless and 51 is the worst quality possible. We tend to like it around 25, but the useful range is around 17 to 28. The other settings are discussed in the section above.
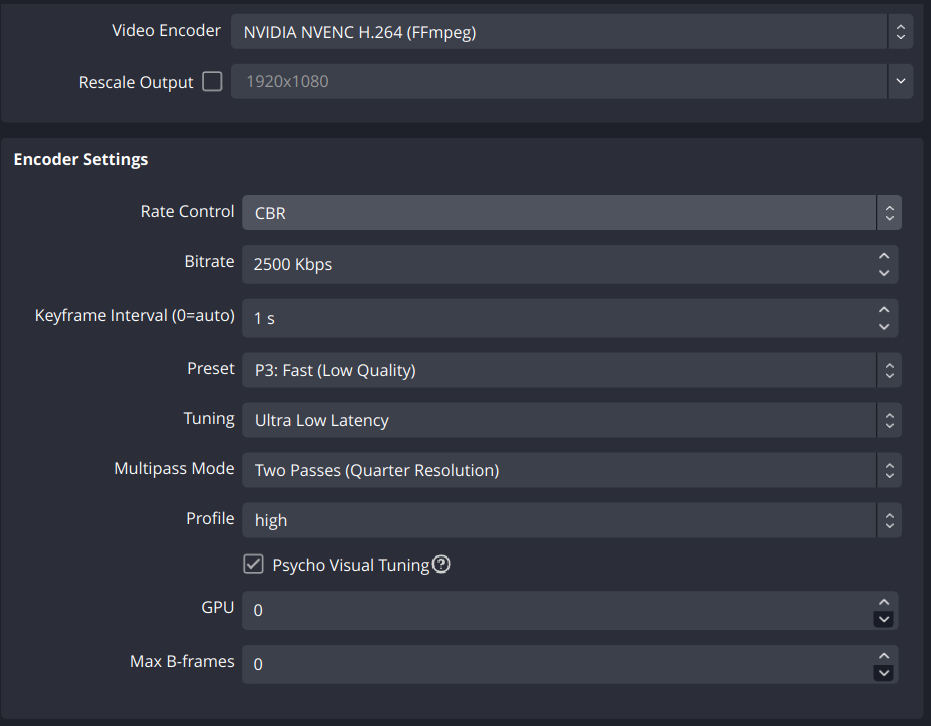
NVIDIA nvenc low latency profile (nvenc)
This is the profile we use for Nvidia nvenc when we have the GPU available and want to deliver a decent quality low latency stream.
| Setting | Value |
|---|---|
| Encoder | nvenc |
| Rate control | CBR |
| Bit rate | 2500 |
| Keyframe interval | 1 |
| preset | P3:fast |
| Tuning | Ultra low latency |
| Multipass mode | Two passes (Quarter resolution) |
| Profile | high |
| Scale | same as source |
Optimal stream settings cheat sheet
Your optimal stream settings might not be the same as the profiles shared above, but we're hoping this gives you a good base to start experimentation from and gives you a bit of insight on what to change when you want more latency, quality or stability. In general the following can work as a cheat sheet:
- Start with the recommended Push settings!
- Stream not "crisp"? You need more bitrate
- Stream not "live"? You need more keyframes
- Stream blowing up your CPU? Try a hardware encoder or lower your settings.
- The "easiest" CPU gain is by lowering the output resolution.
- Playback is "weird"? First try removing bframes, and check if your CPU can handle your settings.
- OBS claims it's "green" but the stream is horrible or not received? The stream status indicator does NOT work for SRT!
- Presets like "ultrafast" are not latency, but frame accuracy vs processing!
Conclusion
Well that is it for the basics on how to get a stream to work and reach your viewers using MistServer. Of course, getting the stream to work and setting the stream just right is not the same, but having playback definitely helps as a good starting point. Most notable is that the point of playback is not the same for every device, this changes because different protocols are used for different devices, inducing different delays.
As a next step you might want to look at how you embed the stream.